Phone: (847)934-8885 | Email: info@paintpartner.com Visit PIP's Facebook Page View Mario Guertin's LinkedIn Profile Visit PaintPartner's Google+ Page Follow PaintPartner on Twitter Visit PIP's Pinterest Page Visit PIP's Houzz Page Subscribe to PaintPartner's RSS Feed

How to Prepare for your Interior Paint Color Consultation

Color design consulting is a service Painting in Partnership, from the Chicago area, offers its clients in order to help relieve the stress of choosing paint colors for their house-painting project. Over the years, we have found that the results of such a paint color consultation can be greatly enhanced by asking our clients to do a little bit of homework ahead of the consultation. Let’s see what it entails.

First, we ask that you create a folder of pictures from magazines and the web, as well as color swatches. It is important that you select pictures and colors that you both like and dislike. Creating this folder will help you define your personal style.

Second, on a scale of 1 to 10, “take the temperature” of each room in your house, in terms of what works or does not work for you, 10 being a room that totally works.

The third step consists of taking an “Emotional Inventory”: how do you feel in each room? In coming up with your assessment, consider the following four factors:
– Function: What is the room used for? Does it serve its function well?
– Who uses the room: Are there special needs at play?
– Mood: What feeling, emotion or mood do you want to convey in the room?
– Change: Is anything going to change? Answering that question now will help you choose colors more appropriately.

As a final step, we ask that you reassess the pictures in your folder using the information you have now gathered on your space. What is it that you like the most in those pictures?

Client's Paint Color Experimentation

Client's Paint Color Experimentation

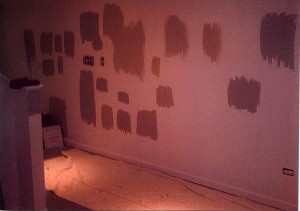
You are now ready to focus on colors! This is the part that many people struggle with, as shown in this picture. The color selection process can be an extremely stressful experience, but it does not have to be. On their own, many people will make very “safe” and conservative color choices, for fear of “making a mistake”. This is where a professional color design consultation can be most helpful.

At Painting in Partnership, we have found that doing the homework described above really helps clients in making color decisions that really work for them. Helping you create an environment that is nurturing to you is the result we strive to achieve with every client.

Resolving the Issue of Peeling Paint and Spalling on Painted Brick

Paint restoration sometimes requires starting over, especially when it comes to painted brick. Painting brick is not a good idea, especially when you are dealing with common brick. Common brick was fired at a lower temperature and was therefore softer than face brick. Common brick was usually used on the rear and sides of buildings. Face brick was used on the front of the house and was much harder and durable, and also more expensive. So, why is it not a good idea to paint brick?

Brick structures are designed to breathe and let moisture escape out through primarily the mortar joints, which are purposely made a lot softer than the bricks it is holding in place. Mortar is the sacrificial component of masonry. In the process of acting as a transport for moisture, it eventually falls apart, but the bricks stay intact. When painting contractors paint brick, it interferes with the design of the masonry and, therefore, the moisture gets trapped. It finds its way inside of the building, or causes the paint to fail and the brick to deteriorate, or both.

Peeling Paint and Spalling on Painted Brick

Peeling Paint and Spalling on Painted Brick

Old Limewash Visible on Exposed Brick

Old Limewash Visible on Exposed Brick

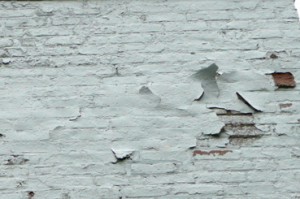
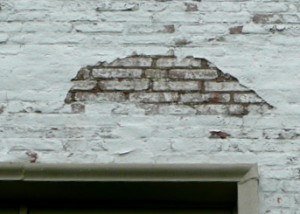
The first picture shows what can happen when common brick is painted: paint peels and brick spalls, as indicated in the right side of the picture. Then, what is the solution to this problem? The next picture gives a clue as to what the solution is.

The white substance you see on the exposed brick area is limewash, which has been used through the ages to beautify masonry structures. Unlike paint, limewash becomes one with the masonry and allows it to breathe and act as it was intended to. There are countless European masonry structures finished in this way.

Unfortunately, if brick has been painted and problems like this occur, the remedy will entail the stripping of the layers of paint. The work will also likely include the replacement of the spalled bricks and the re-pointing of the failed joints with similar mortar. This work will have to be done before limewash can be applied. In order to achieve an opaque look, three or four coats of limewash will have to be applied. Over time, when the limewash wears off, one or two more coats will rejuvenate the look.

As indicated at the outset, paint restoration sometime requires starting over. This is the kind of knowledge and resources Painting in Partnership brings to bear on its work on older homes and “period” homes, in the Chicago area.

The Gold Standard for the Warranty of a Painting Services Company

Reputable painting contractors warranty their house painting work. Most commonly, painting work is warranted for two years. The warranty covers labor and materials to correct deficiencies during the stated time frame. This is the type of warranty Painting in Partnership offer its clients.

As a customer, can you ask your painter for a warranty longer than two years? The answer is yes, but you may have to pay extra for getting that longer warranty. A warranty carries a cost for the painting contractor; the longer the warranty, the higher the cost, like in any other industry. A professional and reputable house painter should assign a price to warranty time frames exceeding the norm, like $500 for 3 years, $1000 for 5 years, as an example. The automotive industry has successfully used this practice for many years.

Gold Standard for a Warranty

Gold Standard for a Warranty

A word of caution: watch out for an unrealistically long warranty; it might be too good to be true! One time, Painting in Partnership was called to give an estimate to repaint a house three years into an 8-year warranty given by the last painting contractor. What is wrong with this picture? The client had asked for a long warranty. The painting contractor gave an 8-yerar warranty and did not ask anything extra for that added service. The problem was that two years, he was sitting on the beach in Florida!

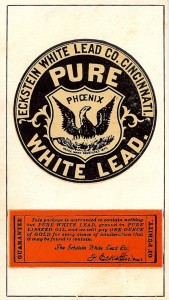
I recently came across an interesting piece of 133 year old paint industry memorabilia, which sets an interesting context for this issue of warrantees. In 1877, a manufacturer of white lead called Eckstein White Lead Co. of Cincinnati had a very unusual warranty. The warranty promised one ounce of gold for every ounce of lead impurity found in their lead paint. This sets the Gold Standard for company warrantees!

Venetian Stucco Ceiling Suits Period Art Deco Living Room Perfectly

Venetian plasters are known and admired for their unique marble-like luster and feel. For centuries, they have adorned some of the finest residences, palaces and public spaces, especially in Europe, where it was first popularized. A high level of skill and experience are required on the part of the decorative painters who create this very special decorative finish.

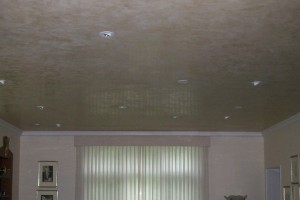
Recently, Painting in Partnership had the opportunity to execute a venetian plaster finish on the living room ceiling of an Art Deco lake-front residence, on the North Shore of Chicago. Notice the soft sheen on the ceiling, reflecting the dim light emanating from the window shades.

Venetian Plaster Ceiling in Vintage Art Deco Living Room

Venetian Plaster Ceiling in Vintage Art Deco Room

Because of its large size (600 square feet) and its 10-foot height, creating a polished plaster finish on this ceiling was especially challenging. It required the use of two rolling scaffolds and the coordinated efforts of two decorative painters from Painting in Partnership, in order to avoid lap marks and inconsistencies in the finished venetian plaster. From preparation to the polishing of the plaster, about 80 hours of labor were used to create this decorative finish.

The ingredients in venetian plaster have evolved over the years. The “natural” versions of plaster, like the one we used on this project, include no more that five percent of synthetic ingredients. The other traditional ingredients include: hydrated slaked lime, pigments and marble flour.

In addition to its great looks, venetian plaster is breathable (lets moisture through), mildew resistant and qualifies as a “green” product as well. It is one of the many decorative finishes Painting in Partnership expertly executes.

Custom Mural Grouping Adds New Dimension to Decorative Painting

There is a great array of faux finishes that talented decorative painters can produce with today’s state-of-the-art products and methods. Custom Mural Groupings are a little-known form of decorative finishing and much under used.

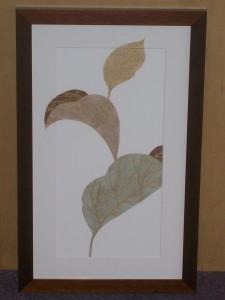
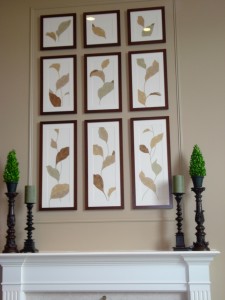
What is a custom grouping? It is a hybrid between mural painting and faux finishing. It consists of a series of related paintings that, when combined into an arrangement, become greater than the summation of its parts. In other words, each painting can individually stand on its own. However, when combined, each piece enhances the esthetic appeal of the other pieces, as shown in these two pictures.

Custom Mural Grouping - Detail

Custom Mural Grouping - Detail

Custom Mural Grouping

Custom Mural Grouping

How did Painting in Partnership come across a project like this? First, during the course of the client’s last house painting project, a picture molding was installed above the fireplace, thereby creating an empty space of about 50 inches by 70 inches above the fireplace. Watching a television show, she got the idea of creating a custom grouping. She then communicated her idea to Lori Vieceli, her interior designer, who suggested to use a stylized leaf pattern as a theme for the grouping. This is how the idea for this custom mural grouping was born!

From this point until installation day, all conversations were held between Lori and Painting in Partnership. Lori trusted the company’s decorative painting skills and our partnership approach to house painting. We proceeded to develop sketches of the paintings, color distributions and a final sample of what a finished painting would look like, so she could ensure we were on track with the client’s vision.

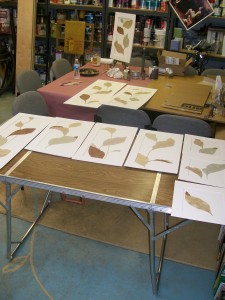
Custom Mural Grouping - In Shop

Custom Mural Grouping - In Shop

From the time that the sample was approved by Lori, until the day of installation, she never felt the need to see any of the decorative painting work. This was the best measure of our success on this project: a totally relaxed designer, with a reputation at stake!

What did the work entail? First we primed the boards and painted them the same color and sheen as the matting. Our mural painter then sketched and painted the backgrounds of all the leaves. Our decorative painter then created a two-color stippled finish for each leaf. As a final step, our muralist painted the veins on all the leaves. This an example of how Painting in Partnership lives up to its slogan of “We paint in Partnership wit YOU!”