Phone: (847)934-8885 | Email: info@paintpartner.com Visit PIP's Facebook Page View Mario Guertin's LinkedIn Profile Visit PaintPartner's Google+ Page Follow PaintPartner on Twitter Visit PIP's Pinterest Page Visit PIP's Houzz Page Subscribe to PaintPartner's RSS Feed

Archive for July 2012

Mildew is Not Dirt; Spores Need to Be Killed Before Painting

When doing exterior painting, surfaces need to be cleaned and mildew spores have to be killed. In the Chicago area, professional house painting contractors know to clean and power wash surfaces before painting them. However, mildew can often be mistaken for dirt. Even though it looks like dirt, mildew has spores and is a living organism. When mildew is present, power washing or cleaning alone will not get the job done.

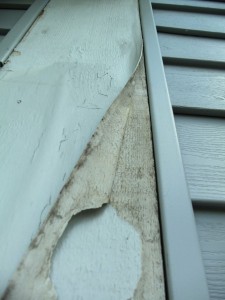
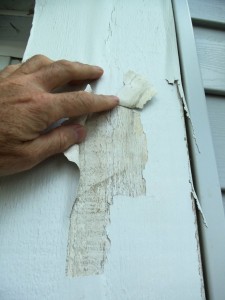
In order to grow, mildew needs three things in its environment: moisture, darkness and food. If mildew spores are not killed before the surfaces are painted, you have supplied darkness and sometime a bit of food to enable the mildew to grow. Especially on the sunny side of the building, the heat and cold cycles add condensation (moisture) to the painted surfaces. The net result of these different forces is: mildew will grow between the last two layers of paint and cause the last layer to fail and delaminate from the previous coat, as shown in our pictures.

Not Killing Mildew Spores Before Painting Causes Paint Failure - 1

Not Killing Mildew Spores Before Painting Causes Paint Failure - 2

When mildew is detected, it is essential to use a diluted bleach solution to kill the spores. In our case, we also use a specially formulated product, which includes a mildewcide and detergents, to help produce a more through cleaning of the surfaces. In Chicago and the Northern states, mildew is an ever present problem. It requires vigilance on the part of the house painting contractor. When in doubt, assume there is mildew and treat it accordingly.

Giving New Life to a Cedar Canopy

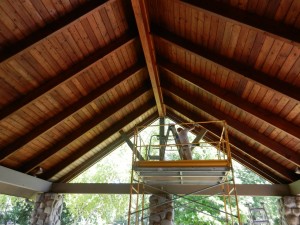
As house painting contractors in the Chicago area, we clean and stain cedar, using a variety of products, from pigmented-transparent stains, semi-transparent stains and solid-color stain. We recently refinished a 22-foot high canopy, adorned with large cedar beams and tongue- and-groove cedar planks. In this particular case, the wood had never been sealed, or finished in any way. Consequently, mildew had grown over the surfaces, especially around the lights illuminating the canopy.

Cleaned and Stained Cedar Canopy

First, in order to safely reach the canopy surfaces, we had to install two layers of scaffolding, as well as use two large articulated ladders. We then had to clean the wood and kill the mildew spores. After experimenting with several cleaning methods, we settled on rags as the best tool to use to clean and rinse the surfaces. We ruled out using power washing, for fear that injecting water between the tongue-and-groove planks might swell up the boards and cause unwanted problems.

To execute the wood finishing, we applied a coat of pigmented varnish to give rich wood tones to the cedar. We then applied a final coat of clear varnish over all the surfaces to give them the appearance of a furniture finish. In all, the project took about seventy hours to complete. Our clients will likely never have to refinish their canopy again. All that may be required is a cleaning every sis to ten years.