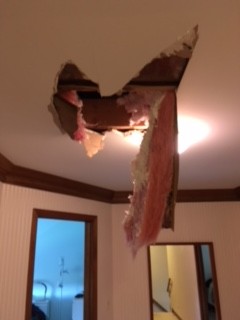
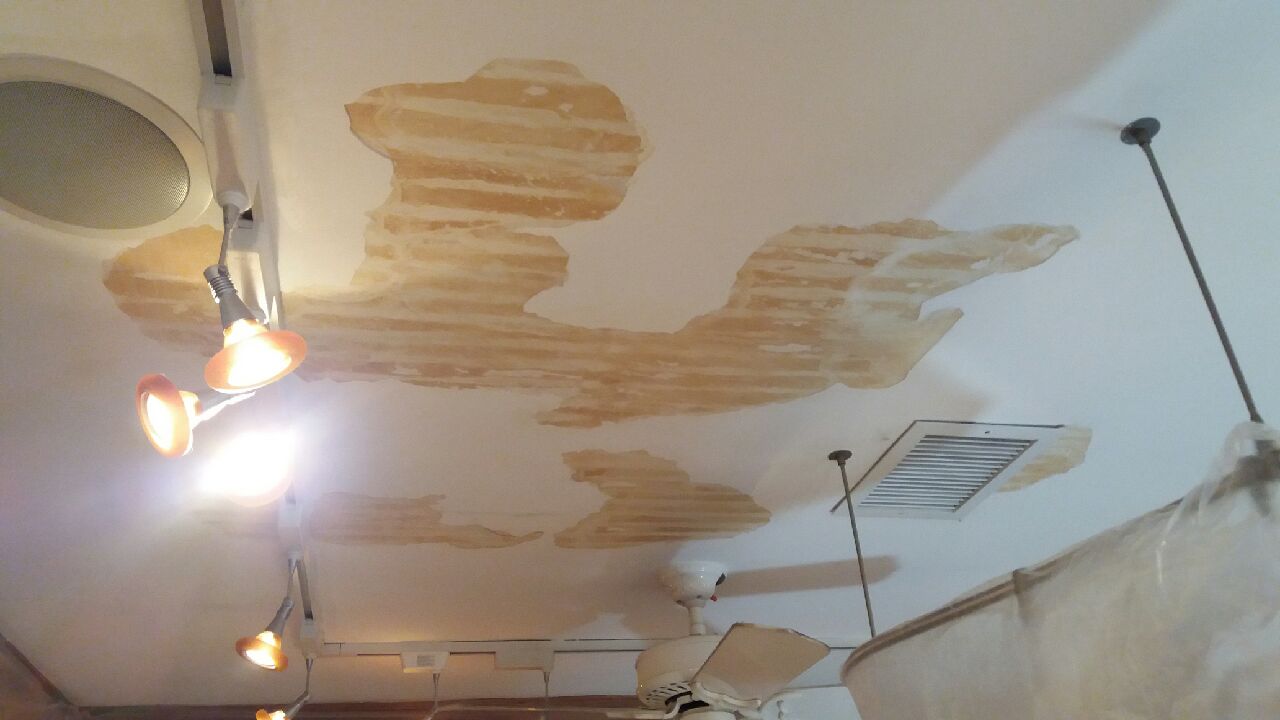
You are the consummate professional and that pride and expertise shines through the work of your associates. Thank you for so greatly exceeding my expectations.
- John Lazar, River Forest
Phone: (847)934-8885 Email: info@paintpartner.com Visit PIP's Facebook Page View Mario Guertin's LinkedIn Profile Follow PaintPartner on Twitter Subscribe to PaintPartner's RSS Feed

Craftsman Tips for Painting Speaker Covers

Friday, February 3rd, 2012

Painted Speaker Cover

Painting parts of the electronic systems, in home and office environments, present special challenges to the interior painting craftsman. In the past week, I had the pleasure of meeting John Baumeister of Tech Tonic at a networking function. As a technology consultant to owners of buildings, John takes his work very seriously. At some point in the conversation, John voiced that one of his pet peeves has to do with mistakes painters often make when painting speaker covers. He queried me regarding the methodology our painters follow when painting speaker covers. I thought I would pass along the information I shared with John.

Our painting experience has been gained over more than twenty years of operation as painting contractors in the Chicago area. First of all, I recommend that the speakers be installed where they belong, prior to any painting, so as to prevent unavoidable touchups. When it is a new installation, we also recommend that the installer leaves off the speaker covers and instead uses the plastic covers supplied by the manufacturer, in order to prevent damage or dust contamination by other trades. For new installations, we also recommend that the installer tags the speaker covers to identify the room and surface they will be mounted on. The installer should also request a signature from the painting contractor (or the owner) when he/she takes possession of the covers. That form should list the covers, quantities and nature of the covers. The use of such a form will limit the opportunity for loss or miscommunication.

Spray Tool for Painting Speaker Covers

What about the painting? Covers will sometime have a liner acoustical fabric on their backside. That fabric should be removed and protected for reinstallation after the painting is completed. The most affective way we have found to paint speaker covers is a simple hand-held spray system called Spra-Tool. It comes with a propellant cartridge, a plastic jar to hold the paint and a connection to bring the propellant to the jar. The paint may have to be thinned ten percent and three thin coats may be required to avoid clogging holes. For darker colors, we recommend to first prime the covers with a bonding primer to ensure good paint adhesion. After the paint has cured, the plastic cover is removed and the custom-painted covers can be installed, for a factory-painted look!

Comments (0)
Categories : Interior Painting

When repainting a room, it makes sense to paint the ceiling at the same time as the walls, since the room is already masked off for the painting project. Most often, the ceiling gets painted a white or off-white color. The theory behind this approach to ceiling color selection is that a darker color has a tendency to make the ceiling appear lower and make the room smaller.

In many cases, the principle stated above has some validity, especially for light-colored walls. However, depending on the mood you want to create in the room, a color, even a darker color may be the right choice in order to create a warm and enveloping feeling. In other cases, when the room has high ceilings and abundant sunlight, a dark ceiling color can bring a room to life and add panache to a space.

Dark Paint Color on a High Tray Ceiling

In the past week, for a client in the Northwest suburbs of Chicago, we repainted a twenty-foot high tray ceiling, dressed with abundant crowns and moldings. The room was large and had five sets of two-story windows. The size of the room, combined with its height, made it appear somewhat cold and uninviting. Additionally, a light color on the ceiling caused the beautiful crowns and moldings to overly blend in. We painted the ceiling dark brown. The whole room came to life!

Making such a bold color choice can be made easier with the guiding eye of a color consultant. When doing interior painting, clients often hold themselves back in their color choices, for fear of making a mistake. A little color consultation goes a long way to embolden clients in making color selections that express their personality and create a nurturing environment for them.

Categories : Interior Painting

This week, we refinished a client’s staircase, taking it from a traditional oak color to a rich brown mahogany color. This client has been upgrading her house for many years and repainting as she went along. The last spaces she redecorated were her 2-story living room, a two-story foyer and upper hall, as well as the basement.

Wood Refinishing - After Wood Toning

Wood Refinishing - Before Wood Toning

During this past summer, she had her front door system replaced with fancy fiberglass doors, which we finished in a brown mahogany color. Upon completing that project, she realized that, when she is ready to redecorate the foyer, she would need to darken the stain color of her staircase, in order to balance off her new doors’ color. Achieving that change in woodwork color is what we call wood toning.

As painting contractors in the Chicago Northwest suburbs, wood toning is one of our specialties. Several years ago, we introduced our client to wood toning when we altered the blond color of her knotty pine ceiling beams, in her study, to a walnut color, in order to match the woodwork color of the adjacent room. So, in the case of her foyer, she knew exactly what to ask for. This is what happens when we educate our customers on the magical possibilities in the field of painting and decorating!

The wood toning process first involves the light sanding and cleaning of surfaces to eliminate any possible contaminants from the surfaces. We then use a gel stain to tome the surfaces with a thin veil of color over the existing stain color. This is the most critical step to achieve a beautiful look. It requires skill and artistry. Once toned, the surfaces are then varnished. Voila!

Categories : Wood Refinishing

When thinking of painting, one automatically thinks of ready-mixed paint in cans. However, the advent of the paint can is a fairly recent phenomenon. For centuries and going back into antiquity, painters were “ingredient mixers”, as well as applicators. There was no such a thing as ready-mixed paints. Painters mixed their paints as they went along. Whoever knew the formulas had a high level of “job security” in those days!

First Spray Painting Machine in America, Chicago, Circa 1892

It was not until 1867 that the first US patent was issued for a read-mixed paint. The ingredients listed in the patent were as follows: oxide of zinc, acetate of lead, sulfate of zinc, silicate of soda diluted in water, lime water and linseed. This list of ingredients may help to explain why, for the better part of the following twenty years, ready-mixed paints had a serious image problem. They were considered to be inferior and undependable.

Then, what is it that caused the balance to tilt in favor of the ready-mixed paints? A few key factors contributed to that outcome. First, the American Industrial Revolution took root during the 1870’s and 1880’s. During that same period, there was also tremendous population growth, fueled by a considerable influx of immigrants. As an example, Chicago’s population grew from 298,000 in 1870 to 1.7 million in 1900. These two forces collided to create the perfect storm for something else to emerge as the painting industry’s driving force: the chemist and paint lab. As the industrial revolution progressed, the needs for painting surfaces became more and more complex and the demand for paints began to outstrip painter’s ability to mix the ingredients. The paint can was born to stay.

As a house painting contractor from the Chicago area, I have always been fascinated by paint memorabilia and the history of the painting industry. I not only have a considerable memorabilia collection, but I also give lectures to interior designers, architects and other interested groups on the History of Paint in America.

Categories : Paint Memorabilia

When refinishing stained woodwork, stripping the old finish and starting over is very time-consuming and expensive process. The good news is that, in most cases, stripping is not necessary in order to rejuvenate your existing woodwork and make it look like new again.

Toned and Re-Varnished door - Before

As house painting contractors, based out of the Northwest suburbs of Chicago, we regularly get called on to rescue the stained woodwork in clients’ homes. After living in a house for over twenty and raising a family, the woodwork often gets a look worn out! Doors and door casings seem to show the most wear – a problem sometime compounded by pets, as shown in the attached picture. Surfaces, like these, that show nicks, scuffs and wear patterns, can be brought back to life by first cleaning the surfaces to remove the dirt, dust and oily residue that have accumulated over time. We then use a gel stain to add a very thin veil of color to the existing woodwork. That stain penetrates and hides all the unsightly blemishes and makes the wood look fresh again. We call this step “toning” the woodwork. Lastly, we re-varnish those surfaces.

Toned and Re-Varnished door - After

We also regularly encounter situations where the finish on the interior bottom rails and sills of the windows breaks down due to effect of the sun and moisture condensation. In many situations, the finish is completely gone and the wood may even show water stains. For some reason, we encounter this problem almost exclusively with casement windows. In a situation like this, before toning the wood, we first sand the damaged areas bare and then stain them with a matching color. After the stain application is dry, we proceed with the toning procedure.

The second picture shows the completed wood refinishing project, after the toning and varnishing have taken place.

Categories : Wood Refinishing