Painting in Partnership listens to our ideas and needs and blends them with their skills to come up with a very unique and satisfying result each and every time.
- A. & C. Yeshwant, MD, South Barrington
Phone: (847)934-8885 | Email: info@paintpartner.com Visit PIP's Facebook Page View Mario Guertin's LinkedIn Profile Visit PaintPartner's Google+ Page Follow PaintPartner on Twitter Visit PIP's Pinterest Page Visit PIP's Houzz Page Subscribe to PaintPartner's RSS Feed

Archive for October 2011

Preserving the Irreplaceable!

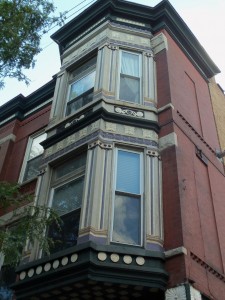
Vintage Tin-Clad Bays - Before

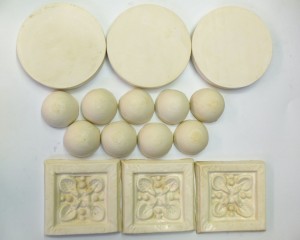
Plaster Reproductions of Metal Ornamentation

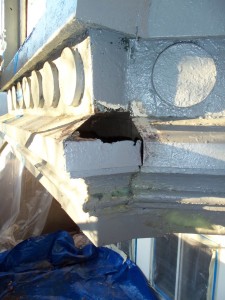
Repair Needed to Tin Surface

We just completed three hundred hours of historical restoration work on a Chicago vintage building, which dates back to 1889. The bulk of the work centered on two Victorian-style, two-story bay windows in their original tin cladding. Our work also included the cornice, which was also quite detailed and made of the same metal.

Needless to say, time and weather had played many tricks on this piece of Chicago history. Numerous elements of the tin ornamentation had fallen off from the building. Part of our work consisted in replicating the missing pieces, using an exterior grade plaster, sealed with 2 coats of linseed oil, then painted and reinstalled on the building. A few years ago, that same technique was used in the restoration of Frank Lloyd Wright’s Dana Thomas House in Springfield, Illinois.

Over the years, the metal ornamentation and the metal cladding had developed cracks, gaps in the joints, holes etc. To execute those repairs, we used a two-part epoxy that is easily shapeable and retains its shape while curing. The goal here was to help keep the water from finding its way behind the metal cladding. So we sealed any opening we could find with that epoxy.

We discovered that the last people who painted the building, over fifteen years ago, had used duct tape to patch holes in the metal cladding and painted it, as shown in the attached picture. Only a close inspection revealed the problem. We called on a metal worker to rebuild a corner with zinc sheet metal.

Lastly, several pieces of the original window casing moldings had fallen off. Over time, the original forged iron nails had rusted away and broken off, leaving some trim pieces dangling. Others had fallen off altogether. We had the millwork replicated in Ponderosa pine to replace the missing pieces.

As historical restoration specialists, we believe that preserving such architectural elements is critical, because they are irreplaceable. Every effort must be made to restore and protect that part of our heritage. But no duct tape allowed!

Gearing Up for a Chicago Oldie’s Paint Color Makeover

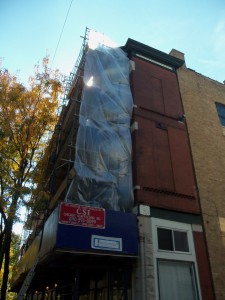
Scaffolding and Dust Containment

A paint restoration project can involve much advanced planning and equipment, especially for an old building in a large urban area like Chicago. Before any work can be performed, power lines will have to be moved because of their proximity to the work areas. The Chicago Department of Operations handles that service, at a hefty cost! Additionally, there may be an additional low voltage wire for police and fire communications that will need to be wrapped. That service is performed by a different Chicago Department, this one at no cost, amazingly.

An old city building is often right up against the sidewalk and, if it has bay windows on its façade, the building actually extends three or four feet over the sidewalk. Consequently, city ordinances require the erection of a canopy over the sidewalk to protect pedestrians. It also must remain lit from dusk to dawn. Once that work is completed, the scaffolding can then be erected to ensure safe and comfortable access to all work areas. In the case of our paint restoration project in the Old Town neighborhood of Chicago, four layers of scaffolding covering the entire façade needed to be installed. The scaffolding company secured the necessary permits prior to installation. Lastly, our painting project will require the rental of a scissor lift to reach a section of the cornice that extends into the alley. A separate permit has to be secured for the use of space in the alley.

Personal Safety Equipment

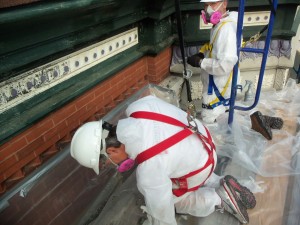
Once the work above has been completed, two important aspects need to be addressed before work can begin on the painted surfaces. First, dust containment must be set up, as required by the RRP rules. In our case, it involved the set up of 4 mil plastic barriers on both ends of the scaffolding, the use of 6 mil plastic to seal the canopy to the edges of the building and the containment of the work areas to capture the paint debris and dust. The second aspect involves personal safety equipment to meet OSHA and EPA requirements. In our paint restoration project, it involved the use of fall arrest protection equipment, hard hats, dust suits, special respirators and eye protection. Having now completed all the surface preparation, we are ready to paint, finally!

Involving the Owners in the Creation of an Exterior Period Color Makeover

When developing a new historical paint color scheme for a building, we believe in involving the clients in the process. As indicated in a recent blog post, we recently went through the development of a new color palette for the façade of this unique 1889 Chicago brick Victorian-era building, now converted to condominiums.

As a first step, we invited the owners to attend a meeting with Rita Guertin, our Color and Concept Consultant. From the outset, it was evident that they all shared a common discontent about the current color scheme. During the meeting, the owners voiced their color likes and dislikes. Some even brought color samples and pictures. We believe that involving the clients early in this way helps to create a successful outcome for everyone.

Historical Paint Color Makeover

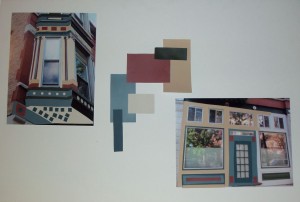
Armed with that feedback and input, we began to put together a six-color palette for the building’s façade. One of the flaws of the old color scheme was that it did not take into account the colors of the building’s masonry: gray limestone, strong red face brick and warm/earthy tones for the common brick of the sides of the building. We felt that incorporating these colors into the palette was needed to create harmony, and highlight the beauty and character of the decorative features of the building.

We then organized a second client meeting to review our proposed historical color selection and its placement on the building. In order to easily communicate the concept, we overlaid our color selections onto four color pictures of the building’s main decorative elements. From the feedback we received, we made only one change to the color scheme: the warm buff color was replaced by a taupe gray color, which harmonized well with the mortar color of the common brick, as well as the limestone.

Our next blog post, will describe how you “rig up” to handle a project of this size and nature, in order to meet the many requirements of City ordinances, as well as EPA and OSHA regulations.