We have used many contractors. Your company is by far the best to work with across all fields.
- Kim Ekrote, Long Grove
Phone: (847)934-8885 | Email: info@paintpartner.com Visit PIP's Facebook Page View Mario Guertin's LinkedIn Profile Visit PaintPartner's Google+ Page Follow PaintPartner on Twitter Visit PIP's Pinterest Page Visit PIP's Houzz Page Subscribe to PaintPartner's RSS Feed

Archive for Cabinet Refinishing

Painting Wood Cabinets – Creating a Bold New Look for a Kitchen

Hand-Painted Cabinets, Hand-Painted Wood Floor and Lacquered Doors

On a recent project on Lake Shore Drive in Chicago, our painting and decorating company was tasked, among other things, to hand-paint the wood cabinets in a large kitchen. In fact, the kitchen had eighty doors and drawer fronts, which included three nine-foot doors for closet areas.

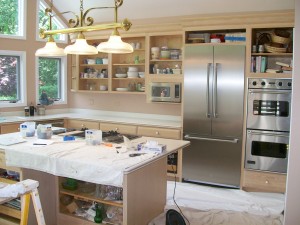
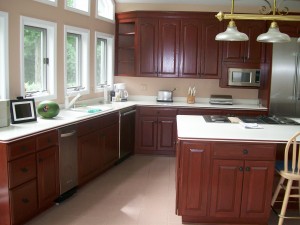
The cabinets were solid cherry and had been subtly distressed with tools by the manufacturer. Additionally, there was a busy tile floor throughout, which was replaced with a wide-plank oak floor. As you can tell from the before and after pictures, our client had a dramatically different look in mind for his kitchen. What he had pictured were hand-painted cabinets, a hand-painted wood floor, dark walls and dark orange lacquered doors for the pantry and laundry room.

Kitchen – Before

Creating a professional hand-painted finish like this involved a total of ten steps and over two hundred fifty hours of labor, executed over a four-week time period. All our cabinet refinishing work was done on the client’s premises, in the empty, large living room adjacent to the kitchen. Because the project was in a condominium building, no spray equipment could be used and all products used were waterborne.

The project included to puttying/sanding of all the hardware holes on the doors and drawers. It also involved the removal of the moldings holding the glass in place on twelve doors and finishing all those moldings and screw heads like the rest of the cabinets. Of course, the project would not have been complete without installing about two hundred new round bumpers on all the doors and drawers!

Hand-painting the floor boards also presented particular challenges. We first had to fill all the gaps between the boards with wood putty. In order to avoid filling the wood grain by puttying the gaps, we had to first tape off the board edges before puttying the gaps. After the putty was dry, we removed the tape and sanded the putty. We coated the boards with three coats of a semi-gloss industrial marine floor coating to achieve the desired durability and sheen.

Our work as a painting and decorating contractor first requires that we deeply listen to our clients in order to grasp their vision. Second, it also requires that we do whatever is necessary to achieve the end-result the client is looking for, by applying our skill, knowledge and experience. Producing that outcome is what we are about as a team.

Keys to Hand-Painting Kitchen Cabinets Professionally

Since the beginning of the last downturn in the housing market, refinishing kitchen cabinets has become a very worthwhile and cost effective alternative for consumers. There are numerous options. They range from toning previously stained/varnished cabinets to painting them and perhaps adding a glaze to accentuate the contours, with a lot of options in between.
An increasingly popular cabinet finish is the hand-painted look. Those are some of the most expensive cabinets in the market today. When hand-painting cabinets, brush marks are created, which is part of the appeal. However, the key for producing a professional result is to manage the brush marks, so that they are uniform, light and follow the grain patterns of the cabinet components, while avoiding blemishes such as sags and misses. Based on our long experience at refinishing cabinets in the Chicago area, here is a list of ten professional techniques we use to produce the best possible result.

Professionally Hand-Painted Kitchen Cabinets

– Use 350-grit sandpaper to avoid creating scratches.
– Since the primer and paint are likely to be waterborne, we recommend the use of a vacuum cleaner, instead of tack-cloth, to avoid
surface contamination after sanding.
– The profile of the cabinet doors will dictate the size brushes to use. Brushes as small as one inch may have to be used. Two-inch
brushes are the largest brushes we recommend. Larger brushes load too much paint on the surfaces.
– Four-inch mohair rollers can be used as paint applicators on flat surfaces., which are then lightly brushed out.
– A bonding primer should be used to ensure maximum adhesion and then lightly sanded.
– Maintaining a wet edge is critical during painting. Wiping off edges may be necessary to avoid creating overlaps.
– The primer and paint should be applied from the center panel, outward.
– Waterborne paints dry quickly. It may be necessary to strain the paint if debris is detected in the paint.
– Cleaning brushes every two or three hours will also reduce the risk of paint contamination from flaking paint.
– Use an abundant source of natural light when painting to ensure a uniform, flawless finish. It is important not to rush the process.

Refinishing kitchen cabinets is not only economical, but is also good for the environment. Producing a professional hand-painted look for cabinets adds panache and flair to your kitchen.

Two Critical Steps to Follow when Refinishing Cabinets

In the Chicago area, Painting in Partnership is known for its cabinet refinishing work. We have brought new life to scores of kitchen cabinets and created a myriad of different looks, from changing the color of stained cabinets (without stripping), to painting stained cabinets, to antiquing painted cabinets, to glazing cabinets and more.

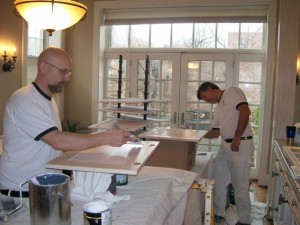
Cabinet Refinishing - During

Cabinet Refinishing - During

We do our cabinet refinishing work on the client’s premises, using brushes and rollers. To preserve the client’s living environment, we do not use sprayers. All the work is done by hand, from bonding coats to the clear coats. Another advantage of this approach is that the client does not need to empty the cabinets before we do our work.

When doing cabinet refinishing, there are two steps that are especially critical for the long-term success of the project. This first step consists of giving the surfaces a through cleaning. This may sound kind of basic, but it is often overlooked or not given enough attention. A kitchen is by definition a place that attracts oil from hands (or from pets’ coats), soap residue, fats from cooking and food particles. It is critical to clean the surfaces to be finished, even using degreasers if needed.

Cabinet Refinishing - Bonding Primer

Cabinet Refinishing - Bonding Primer

The second critical step consists in the priming of surfaces with a strong bonding primer. Because the surfaces have often been previously been varnished and that they are susceptible to being hit by objects, it is essential to use the best available bonding primers. In the case where a change in the wood color is needed, a bonding clear coat can be used.

By taking these simple first two steps, Painting in Partnership ensures longevity, as well as beauty to its cabinet finishing projects.

Transforming Stained Oak Cabinets into Black Beauties with Gold Touches

Refinishing cabinets can have a dramatic impact on their appearance and the look of an entire room. A client in the Northwest suburbs of Chicago was not happy with the look of their stained oak vanity cabinets. They felt that the doors and trim being stained in the same reddish color as the cabinet, it made the room look too heavy and not interesting enough. They also wanted to find a way of incorporating the gold tones of their faucets and door hardware in the new look of their cabinets.

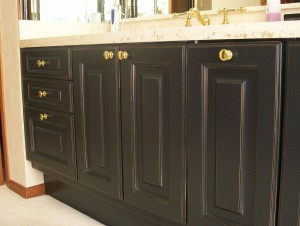
Refinished Cabinets with Gold Touches

Refinished Cabinets with Gold Touches

This was the perfect assignment for Painting in Partnership’s team of craftsmen and decorative artists. The first step for such a house-painting project consists of developing a representative sample for the client’s review. Once the client approves the sample, our task consists of faithfully replicating it unto the cabinets.

Before taking any painting steps, it is important to remove all the hardware from the cabinets and clean the surfaces to ensure that oils and soap residue have been removed. The first painting step consists of priming the surfaces with a bonding primer, so that the finish coats will solidly adhere to the cabinets’ old finish. Our painting craftsmen then apply two coats of waterborne enamel.

Our next step is of a decorative finishing nature. We skillfully apply a very small amount of rubbing gold wax to the various edges of the cabinet doors and drawer fronts, thereby creating a very subtle gold shimmer, as shown in the picture. For this client, just painting the cabinets would not have sufficed. The gold touches made it work perfectly.

Understanding the needs of clients, combined with painting and faux finishing skills can beautify a client’s space. This is the kind of work we do every day at Painting in Partnership.

Decorative Finishing Alternatives for Cabinet Refinishing

Faux painting techniques give you wonderful options to refinish cabinets. What can you do besides just painting your cabinets? First, you have to decide what you do not like about your cabinets. Is it the color of the stain? Many times, people will get tired of the “golden oak” or the “pickled” look of their cabinets, but they like the idea of their cabinets looking like stained wood.

Cabinets Before Faux Painting

Cabinets Before Faux Painting

You are not limited by the color of your stained cabinets. Cabinets can be given the look of walnut or mahogany. This can be accomplished without having to strip your existing cabinets. Additionally, you can save at least $10,000-$20,000 in the process.

Our decorative finishers would first apply a coat of transparent bonding primer. Then one or two coats of a stain glaze would be applied to give you the color you desire. Our painters would then apply a coat or two of varnish.

Cabinets After Faux Finishing

Cabinets After Faux Finishing

“No, I am tired of the wood look. What are my options?” Painting your cabinets is a fine option. The new waterborne enamels give you a beautiful look, because of their ability to easily level off. The secret is to clean the surfaces well, use a bonding primer and apply a good measure of painting craftsmanship.

If you go the painted route, you have the option to apply a glaze over your cabinets and wiping it off and leaving it in the recesses of the wood for a beautiful expensive look. Our faux painters can produce finishes in an array of colors and styles.

Our faux painting service includes the development of a sample door for your approval before any work is done. After the sample is approved, our job becomes about replicating that sample unto your cabinet surfaces.