We have used many contractors. Your company is by far the best to work with across all fields.
- Kim Ekrote, Long Grove
Phone: (847)934-8885 | Email: info@paintpartner.com Visit PIP's Facebook Page View Mario Guertin's LinkedIn Profile Visit PaintPartner's Google+ Page Follow PaintPartner on Twitter Visit PIP's Pinterest Page Visit PIP's Houzz Page Subscribe to PaintPartner's RSS Feed

Archive for April 2011

How the “Low Bid” Often Becomes the Costliest – Choosing Price Vs. True Value

As a painting contractor in the Chicago area, I am faced almost daily with potential clients who struggle with the appeal of a low bid in their decision-making process. The current economic environment has caused the ranks of low-bidders to swell to new heights, making it even harder for consumers to decipher the true value in a house-painting proposal.

Today, this point was made clear in a phone conversation I had with one of the owners of a three-flat in Chicago. On the rear of the property, there a three-story deck structure with wood decking and painted steel framing, railings and posts. Four years ago, they had the steel repainted. She mentioned that 6 months after the repaint job, rust started to appear and the paint stated to flake off. Forty months later, the situation in much worse.

Low Bids vs. True Value

I voiced my concern that I may not be able to help because of the common practice of selecting the low-bidder on such projects. She did confirm that they had picked the low-bidder on the last job. I told her that we would surely not be the low-bidder, but that we could give the best long-term value. She thought that the painters used the wrong paint. I explained that it was very possible, but that the reason for the failure most likely lied in the poor or non-existent preparation of the surfaces prior to painting. I also told her about the rust inhibitive primer we use over bare areas, after they are scraped and sanded.

I think I got through to her because, at some point in the conversation, she told me how much they budgeted for the project (hopefully, they put enough money in the pot this time). She is sending me digital pictures of the structure so I can assess if it worth my time to bid for the job, considering the maximum amount they plan to spend.

As a painting contractor, I liked this conversation, because it focused the client on the real issue: what is it that creates true value in a paint job, price being only one part of the equation?

A Faux Finish and Mural Painting Can Be Repaired – With Skill!

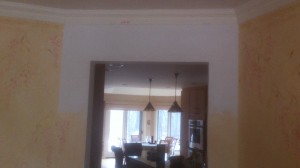
This past week, Painting in Partnership, from the Chicago area, repaired a decorative finish that we had executed ten years ago. We also repaired painted mural elements that had later been added to our work, by the client’s friend. The decorative painting had been damaged by a water leak in an upstairs bathroom, just above a doorway.

Repairing Decorative Finishes - Before

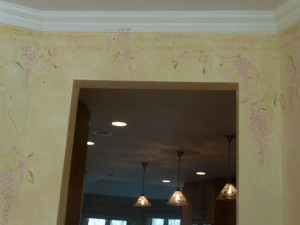
In those days, we used eggshell oil as a basecoat and oil glazes. With the new ASHA regulations, eggshell oil products were no longer available. We had to resort to reformulated satin oil products that were still on the market, at least for now. Even though the damage was limited to the upper portion of the doorway, we repainted the two side legs of the doorway opening to avoid creating any repair lines. Because we keep excellent records for all the decorative finishes we create for a client, we were able to recreate this painted finish perfectly. Our muralist, even though she did not do the original painting, was able to recreate the mural elements that had later been added to our work.

Repairing Decorative Finishes - After

This room was the only work we had ever done for this client. Yet, all she needed to do, after ten years, was to place a phone call to have us rescue the situation and help protect what had been a $5,000 dollar investment in the decorating of her dining room. She was thrilled. Halfway through the repair process, she took me in the adjacent room to show her next project. Someone had given her a bid to do this entire two-story room for an unbelievably low price of $750, including a decorative finish all over the walls. I made the point to her that someone who charges those kinds of prices cannot stay in business for long. I further explained that, because we price our services correctly, we have been in business for over twenty years and we were able to save her $5000 in her dining room.

So she asked me to bid for her room. To keep the cost down, we limited the decorative finish to the fireplace wall and will use plain paint on the other walls. The cost: $3,000 – she gladly hired us to do her next house painting project! In the short-run, our painting prices are higher than many others. However, in the long-run, we are the best value – she knows it well!

Matching Wood Finishes Tests the Skills of the Best Craftsmen

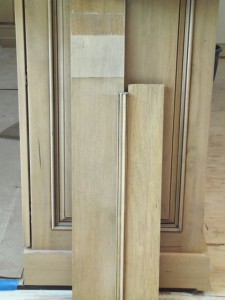
Wood Finishing - Our Samples

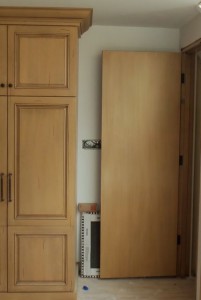
Painting in Partnership, from the Chicago area, was recently faced with an unusually high wood finishing challenge: Matching a factory-applied, six-layer lacquer cabinet finish unto two doors, casings, railings and baseboards. Everything had to be field-finished and spray equipment was not an option. Achieving an “exact” match was part of the requirements for this job.

As you may know, lacquer dries almost instantly and each coat melts into the previous one. The cabinet manufacturer had given us the products to use for the wood finishing. However, we could only use two of the products: the toner and the glaze. We had to separate the toner coat from the glaze coat with two layers of Enduro clear waterborne urethane made by General Finishes. Why did we use two layers: any holidays or shy areas in one clear coat would have ruined the toner coat when the glaze was applied! How did we get around the quick dry times: by using the skills of two well-coordinated craftsmen! The challenge was especially acute when we painted the twenty-five square foot door.

Wood Finishing - Final Result

To complicate things further, the wood used for the cabinets was alder and the wood used for the field woodwork was birch. A clear coat applied over alder wood results in a lovely brownish color. However, a clear coat over birch creates in a much lighter color. Since we were given birch to work with, we had to stain the birch wood to match the color of a sealed alder, so we could start our wood finishing on the same footing as the factory production. We used a quick drying waterborne stain from General Finishes and a seal coat on top of it, before we proceeded with the lacquer toner.

In all, eight layers were needed to create the desired matching finish. Our craftsmen at Painting in Partnership are experts at using cutting-edge products and technologies to meet the most challenging of our clients’ needs, that they involve wood finishing or any other aspects of painting and decorating or historical restoration.