We have used many contractors. Your company is by far the best to work with across all fields.
- Kim Ekrote, Long Grove
Phone: (847)934-8885 | Email: info@paintpartner.com Visit PIP's Facebook Page View Mario Guertin's LinkedIn Profile Visit PaintPartner's Google+ Page Follow PaintPartner on Twitter Visit PIP's Pinterest Page Visit PIP's Houzz Page Subscribe to PaintPartner's RSS Feed

Modern Windows Can Create Serious Maintenance Issues

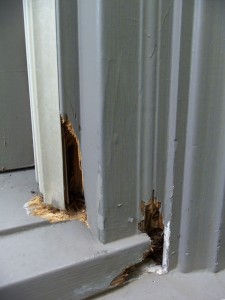
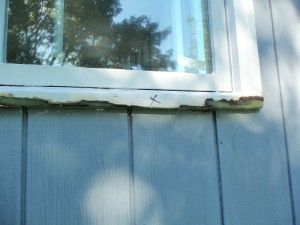
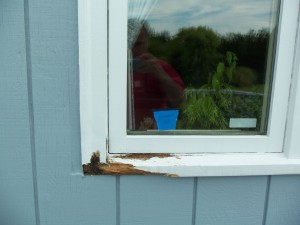
Modern Window - Rotted Wood

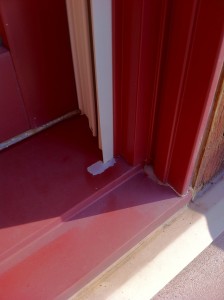
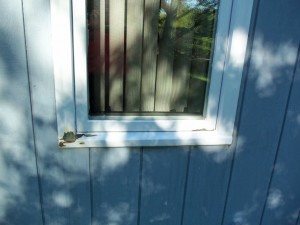
Aluminum-Clad Window - Paint Failure

In our window restoration work in the Chicago area, we are finding that flaws in the design of some modern windows contribute to premature wood decay and paint failure. As house painting contractors, we are increasingly called upon to do epoxy restorations on wood windows where the wood has rotted in the lower portion of the styles, brick moulds and the sill next to those areas.

On two different painting projects, we recently restored double-hung windows, which involved similar issues with the vinyl jamb liner. In both cases, because of its design, that portion of the jamb creates channels that trap moisture. Additionally, in the case of wood windows, these channels inhibit the proper caulking and painting of the inside portions of those channels. Since the moisture has nowhere to go, it finds its way into the miter cuts in the bottom portions of the window components and rots the wood. The picture of the wood window clearly shows the damage this problem causes. For windows like these, we recommend a by-yearly inspection and maintenance program to detect and correct the problems before they get out of hand. Periodic maintenance is essential in order to mitigate the problems associated with this window design flaw.

The other picture illustrates a similar issue with an aluminum-clad window. In this case, rotting is not the issue; premature paint failure is! On the sunniest side of the house, the moisture that gets trapped in the vinyl jamb liner heats up, deteriorates the paint film and causes it fail prematurely. On the sunny sides of a house, such windows require maintenance every 5 years or so. To correct the problem, the sills have to be sanded and repainted with 2 coats of direct-to-metal paint. Because of the discoloration caused by the sun, the whole window will likely have to be repainted. In order to ensure color uniformity, every window on that side of the house may have to be repainted as well.

Educating our customers on the pitfalls of some window designs is part of the value we create for the clients who use our window restoration services.

Vintage 1889 Chicago Building: Ready for “Period” Color Makeover

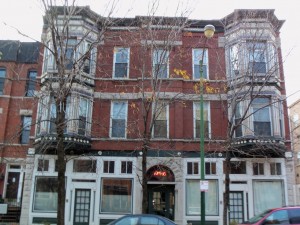
A post-“Great Fire” building in Chicago is about to get a historical paint color makeover. I was first contacted to bid for the repainting of the façade of this building ten months ago. From the start, I understood that changing the color scheme of the building to a historically more authentic palette was a very important concern to the owners of the building.

Vintage !889 Chicago Building - Before Period Color Makeover

For different reasons, the decision to act on the project was delayed for many months. In August of this year, our company was re-contacted by the condominium board and finally chosen to execute the exterior painting of the façade of this historical building. Having assessed that the board strongly desired a change in the paint colors, we immediately convened a meeting with a number of the owners. Our Color and Concept Consultant led the meeting.

Most of the owners who attended had given considerable thought to the colors they did not like presently and what they would like to see. Some had gone out into the neighborhood and come up with other buildings they liked and wanted us to see. Others had gathered color swatches and contributed their ideas in this way. Everyone seemed really excited to play a role in creating a color scheme that did justice to the vintage of the building they all loved.

Later in the week, we are meeting again with the owners to present two or three alternative color schemes for the building. I will update you once the decision has been made.

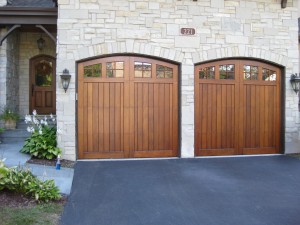
Deciding on Refinishing Wood Garage Doors: The Milky Look or the Wow Look!

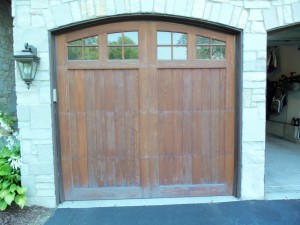
Wood Garage Doors - Milky Look

We just completed the stripping and refinishing of two wood garage doors in a Western suburb of Chicago. This is one of our specialties as house painting contractors. Over time, the sun and the elements had caused the varnish to break down and become milky and dull. When wood doors develop that look, it becomes a case of starting over!

To have easy access to the door surfaces, we removed the weather stripping on the outside of the doors. We then proceeded to strip the doors and sand the surfaces with different grades of sand paper to ensure smooth surfaces. Next, we created a custom color blend to match the color of the existing wood entry door to the house, using a Sikkens product specially designed to finish wood doors and windows. To get the proper color intensity, we only needed one coat of the pigmented varnish, followed by two coats of the clear varnish. Wow, what a difference!

Wood Garage Doors - Wow Look

It is important to note that in spite of the fact that the front door and the garage doors were installed at the same time, the finish on the entry door had remained intact because it is sheltered from both the sun and the elements. Let’s face it: refinishing wood doors is an expensive proposition! When the doors are exposed to the elements in the way those garage doors are, it is critical to do periodic maintenance, in order to avoid having to refinish the doors again. To that end, we recommend a two-year maintenance program that includes a close inspection of the door surfaces including the weather stripping, a cleaning of the doors, stain touch ups if need and a re-varnishing of the doors. The cost of such maintenance is usually only12 to 15% of the refinishing costs. Our clients like the maintenance program because it gives them the peace of mind of knowing that their investment is protected, while enjoying the “wow” look of their doors.

Early Detection is Key to the Success of Window Restoration

Window Restoration Project

Window Casing - Before Restoration

Yes, even a seventeen-year old house can be in need of window restoration work, especially when it boasts 91 windows and 30 freezes. In all, forty of the casings will need epoxy repairs and a few will need some wood replacement as well. On the house’s south side, the sun is the major trigger for the deterioration. On the north side, high and thick landscaping interferes with air circulation and causes the moisture to overly befriend the window components. In both cases, the moisture settles in the areas where the casings meet the sills and rots the wood.

This new client is interested not just in restoring the windows and arresting the deterioration, but also in doing the preventative maintenance that will minimize or eliminate the need for such costly repairs in the future. Starting next year, we will be doing a yearly inspection of all the windows and freezes to detect any caulk failure on or around the components. Caulk failure is the culprit behind much of the rot that develops on window components. Ensuring a tight caulk seal between all the joints is key to a sound window maintenance program, because it prevents the intrusion of moisture into the window components.

As house painting and decorating contractors in the Chicago area, part of our mission is to preserve and protect the useful life of surfaces. We favor restoration over replacement. Restoration preserves surfaces and saves you money!

Replace or Restore Windows – That Is the Question!

Before the economic downturn, replacing windows was a fairly routine decision. The new economic reality we live in has forced homeowners to take a much harder look at that decision and look to do preventative maintenance in order to preserve the life of their windows. As house painting contractors in the Chicago area, we have welcomed that change in outlook on the part of consumers.

Epoxy Restoration Underway

Restore Sill with Epoxy

Replace Wood Sill

The most vulnerable parts of a window are, in this order: sill, bottoms of casing stiles, the bottom rail of the sash. When not maintained properly, these parts can quickly deteriorate and rot away. Most of time, the culprit is the moisture that intrudes through openings in the caulk and gets trapped in the lower components of the window listed above.

What do you do when rot has developed on window components? Replacing windows is an expensive proposition. With the carpentry and finishing costs involved, the replacement cost of a window can easily top $1000 and sometimes far exceed that amount, depending on the size and complexity of the window. Epoxy restoration and selective wood replacement can save homeowners a lot of money and greatly extend the life of the windows. Making the proper assessments to determine what can be restored with epoxy and where wood replacement is needed are key to the success of window restoration. In some cases, there is too much damage and the window or sash must be replaced, However, in most cases, restoration is the best choice!

The pictures, I have attached show a sash and sill in the process of being epoxy restored, a sill that has been restored and a sill that will require replacement because of the extensive damage.

When doing epoxy repairs, it is essential to remove all rotted fibers and make sure that the area has dried out completely before the epoxy is used. An epoxy consolidator must then be used to harden the soft fibers before the epoxy filler is used.

Finally, the cost of window maintenance can be reduced even further by doing a close by-yearly inspection of your windows and looking for any sign of failure in the caulking. That step will greatly reduce the chance of rot developing on the window components. This is how Painting in Partnership preserves your wallet, as well your windows!