We have used many contractors. Your company is by far the best to work with across all fields.
- Kim Ekrote, Long Grove
Phone: (847)934-8885 | Email: info@paintpartner.com Visit PIP's Facebook Page View Mario Guertin's LinkedIn Profile Visit PaintPartner's Google+ Page Follow PaintPartner on Twitter Visit PIP's Pinterest Page Visit PIP's Houzz Page Subscribe to PaintPartner's RSS Feed

Author Archive for Mario – Page 6

Repairing and Matching a Decorative Finish

Water-Damaged Ceiling Planks

Water-Damaged Ceiling Planks

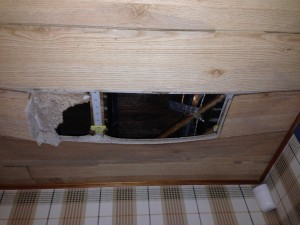
As a painting and decorating contractor in the Chicago area, we are often asked to repair and match an existing decorative finish. We recently received such a request from a client. Her basement ceiling was clad with simulated wood planks made out of a material similar to that of acoustical tiles and wrapped in a vinyl that imitated rustic wood, including knots. The water had stained, bowed or destroyed seven of those boards. The entire ceiling covered about 500 square feet. The goal of this restoration project: Making it look like it never happened!

Achieving that goal is a lofty one. When you are the person who did the original work and have kept good records, the task is greatly facilitated. However, when it involves the work of others and no records exist, the task can be very challenging. This restoration project was of the latter sort.

Our carpenter’s investigation revealed that these planks were made in a tongue and groove style and that seven of the boards had been compromised. He concluded that the planks should replicated in wood, with the same dimensions, in the same tongue and groove style.

New Planks Grained to March Old Ceiling

New Planks Grained to March Old Ceiling

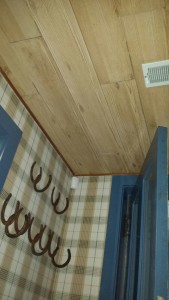
We then turned to our graining specialist to first replicate the colors of the wood grain. It takes a trained eye, patience and a willingness to experiment to arrive at the combination of colors. The next step was to mimic the style of the wood grain, including the knots present in the original planks. That process also involves experimentation with different tools and techniques. Finally, matching the sheen of the clear coat was the final touch to the restoration work. In this case, we used a dead flat varnish to match the surrounding sheen on the old planks. The second picture shows the final result: Mission accomplished!

In a way, the plank design made it easier to blend in the graining patterns, because there were no edges to contend with. When a decorative finish has been damaged, we must sometime redo the whole surface affected by the damage, because it is impossible to blend the edges of the repair. Because of the experimentation needed, the cost of a decorative finish repair can be disproportionately high. However, that cost is only a fraction of what a complete redo would be. In our house painting company, we do whatever it takes to meet a client’s need!

Ensuring Safe Access to Paint Chicago’s Exterior Building Surfaces

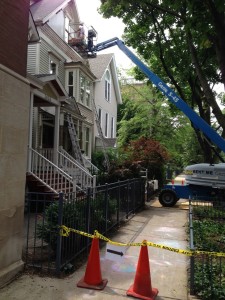
An important part of our work as house painters involves the paint restoration on century-old buildings in Chicago. Some are wood-frame houses like the one in this picture. Others have elaborate metal cornices and bay windows. Ensuring safe access for the preparation and painting of the surfaces is of foremost importance.

Boom Access to Building Facade

Boom Access to Building Facade

The house in this picture is located in one of Chicago’s many old neighborhoods. It is about one hundred twenty years old and presented a number of challenges from an access point of view. Two of the obstacles were the front porch/steps and the other was the roof of the bay window. We accessed that a forty-foot ladder could reach some of the gable surfaces, but not all. So we had to look into using a boom.

At first, we thought that a sixty-foot boom could access the highest areas from being parked in the street. However, because of the proximity of two trees, we determined that a shorter forty-foot boom should be used, so it could clear the tree branches. The trees also made it necessary to park the shorter boom on the sidewalk and close the sidewalk to pedestrian traffic. Since the boom had to jump the curb, we set up a temporary driveway with 2×8 and 2×4 lumber. Three sheets of ¾” inch plywood were used to protect the sidewalk and parkway.

Once those factors have been assessed and decisions have been made about equipment and procedures, an equally important aspect has to do with securing Chicago permits to have access to the public ways. In this case, we needed three permits: fifty feet of curb space to move and park the boom, sidewalk closure and barricade for pedestrians and temporary driveway for the boom. We also resorted to the services of an expeditor to facilitate the process. In all, the cost of the rental, permits and expeditor fee was about $2,000 for three days of use.

Safety is paramount on projects like this. Our employees have gone through training to be certified as boom operators. We take our preservation work on Chicago’s old structures very seriously.

Painted Stripes Can Add Wow Appeal to a Ceiling

Painted Stripes on Bathroom Ceiling

Painted Stripes on Ceiling – Craftsman Style

Gilded Stripes on Ceiling – Craftsman Style

As Painting and Decorating Contractors in the Chicago Area, we are called on to execute an array of decorative painting projects. Stripes are one of the options in our bag of tricks. Painted stripes are more commonly thought of to ornate walls, either as a border, or in vertical or horizontal patterns. Unlike wallpaper, painted stripes are custom and can be adjusted to exactly fit the dimensions of a wall. The size and sheen of the stripes can be tailored to meet any need at hand.

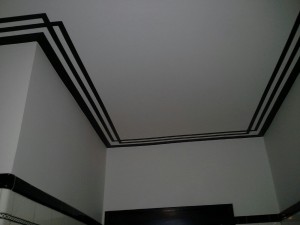
An often-overlooked application for painted stripes involves ceilings. We recently worked on such a project in a 1920’s bungalow on Chicago’s North side. The room was the house’s hall bath. The lower six feet of the walls was clad with a white subway tile, a black bullnose and base, as well as a thin patterned black/white stripe. We painted the upper wall and ceiling in a color to match the white tile. Then came the fun part: executing a stripe pattern that worked well with five inside corners and one outside corner.

Coming up with the appropriate design was a major challenge. The lady of the house had a picture of a ceiling pattern. However, it turned out it could not accommodate the outside corner, without making the pattern look disjointed. This is when her husband was inspired to try his hands at coming up with a design. His first attempt crashed and burned. His second was a resounding success: he nailed the design, as shown in the attached picture!

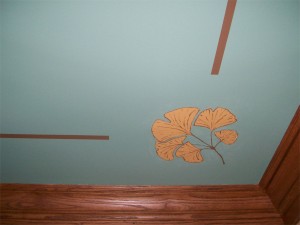
Painted stripe designs can also be very effective in “Period” houses, like Art Nouveau, Craftsman or Art Deco styles. I have attached pictures of two Craftsman-style projects to illustrate the possibilities. For the first one, we created a Gingko-leaf pattern to frame the four corners of a living room. In that case only a single painted stripe was used, which led the eye to the corner designs. The second project involved a dining room. In that case, we gilded a more intricate stripe pattern. That project also involved gilding square wood buttons in the upper corners of five-foot panels framing the room. Look at the metallic sheen!

Offering decorative painting custom solutions to help enhance the beauty of our clients’ vintage houses is part of what we do as house painting contractors.

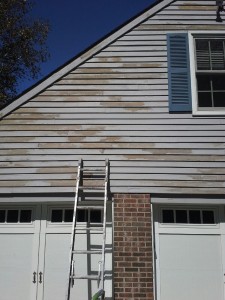
Peeling Solid Color Stain on Cedar Siding?

Peeling Solid Color Stain over Ceder Siding – Part 1

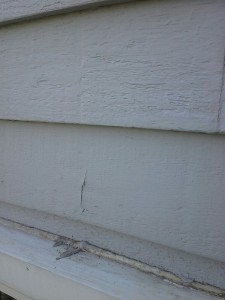
Solid color stain is not supposed to peel (like paint does) when applied to cedar siding. The unfortunate reality is that peeling solid color stain is a common occurrence. Many factors can contribute to this problem.

First, many house painting contractors promote the use of a two-coat paint job as offering greater value than a one-coat job. The homeowner assumes that two coats ought to be better than one. However, unless a second coat is needed to ensure good coverage (because of a change in color or a very worn original coat), a second coat only adds thickness to the coating. In the long-term, those multiple coats of stain cause the stain to behave like paint and peel. Generally, homeowners should resist the temptation to accept the second coat of stain, at least without asking the reason for that recommendation.

Peeling Solid Color Stain over Ceder Siding – Part 2

Other factors can also contribute to the peeling stain problem. Failing to kill mildew spores in the cleaning process can cause the last coat to delaminate from the previous coat. Power washing alone does not kill the spores – a diluted bleach solution does! Staining or painting over mildew spores gives them darkness, which helps them to propagate under the last coat and cause coating failure.

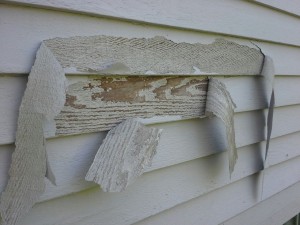
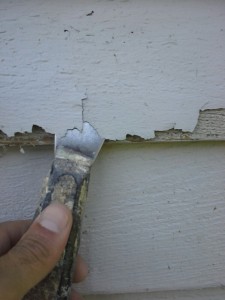
Another insidious cause of solid stain failure on cedar has to do with dead wood fiber on the face of the siding. When the peeling stain is scraped off, dead wood fiber often stays stuck to the back of the flake. This is a telling sign of the problem. No stain, or paint can adhere to dead wood fiber, leading to major coating failure. When this condition exists, we have noticed that the sun accelerates the demise of the coating, by causing countless hot/cold cycles (even many times a day). If a tree shades a portion of the house, that portion may not exhibit the problem, or very little. The North side of the house may also show little sign of delamination as well.

Peeling Solid Color Stain over Ceder Siding – Part 3

Peeling Solid Color Stain over Ceder Siding – Part 4

We are often asked what may have caused the dead wood fiber in the first place. We have two main theories. One is that the siding may have sat unfinished for too long after it was installed on the house. The other has to do with moisture. We have noticed that the siding in problem houses is almost never back-primed, which causes the moisture to penetrate into the wood and migrate towards the exterior of the siding. The hot-cold cycles degrade the wood behind the coating and cause the stain or coating to fail. A failed or poorly performing vapor barrier may also aggravate the problem, by allowing more moisture to penetrate into the siding.

The bad news is that there is no easy or inexpensive way to deal with the problem. Extensive scraping and sanding is needed. We also cannot guarantee that the problem will not reoccur. In fact, the stain or paint that will not come off at this time will likely come off later. The best outcome you can hope for is to eventually get ahead of the problem. Unfortunately, the most permanent solution is to remove the siding, install a new vapor barrier and prime the new siding on all sides before its installation.

As house painting contractors in the Chicago area, we have a passion to get to the root cause of the problems we encounter, so that we can devise the best possible solutions and create the most value for our clients.

Repairing Holes in Drywall after the Electrician Leaves – Making it Look Like it Never Happened!

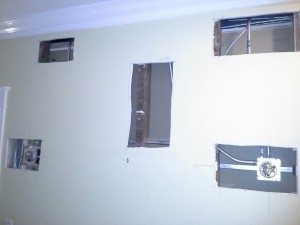
Holes in Drywall

Making holes in drywall disappear, as if they never existed, is one of the skills of a competent house painter. As painting and decorating contractors in the Chicago area, we are often called upon to do such repairs after an electrician has added electrical boxes or fixtures to an existing house. This is also a common occurrence when a house is being rewired.

The first picture shows how one of the walls looked when we first came on the premises of a recent project. On that particular project, there were sixteen holes that varied in size from ten square inches to three square feet. Our record is twenty-four holes in the plaster walls of three rooms – ouch! I think the electrician was a bit Sawzall-happy.

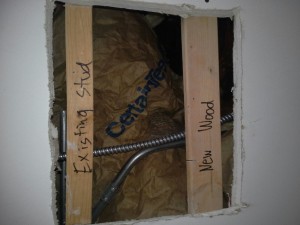
Wood bracing for Drywall Patch

How do you go about disappearing a hole in drywall? A drywall patch must be screwed to wood bracing. On occasion, there is a stud nearby that can provide bracing for at least one side of the patch. More commonly, we need to cut pieces of 2×1 wood and screw them to the rear of the existing drywall to create the bracing we need, as shown in the next picture. Sometime, we may need to enlarge the hole or combine it with other holes to make the repairs more efficient. We use our professional judgment to make those calls.

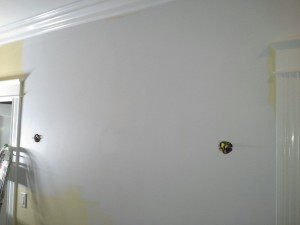
Repaired Five Holes in Drywall

At this point, it is important to ascertain the thickness of the surrounding drywall. In modern construction, walls are clad in 5/8” and ceilings in ½” drywall (but not always). If you have to, you are better off using a thinner piece that a thicker one, as it can be filled in with joint compound. The new drywall piece is then screwed to the wood bracing, taped and patched. A top quality repair will generally require three coats of joint compound and easily cover an area three or four times the original size of the hole. The patch is then ready to be primed. By then, the hole has disappeared!

Repairing holes in drywall is part of the skill-set of a competent house painter. Making it look as if it never happened is the result our clients can expect from us.