The painters were top notch. They worked very efficiently, courteously and extremely cleanly.
- Jack Bernauer, Inverness
Phone: (847)934-8885 | Email: info@paintpartner.com Visit PIP's Facebook Page View Mario Guertin's LinkedIn Profile Visit PaintPartner's Google+ Page Follow PaintPartner on Twitter Visit PIP's Pinterest Page Visit PIP's Houzz Page Subscribe to PaintPartner's RSS Feed

Author Archive for Mario – Page 12

The Maintenance of Chicago’s Historic Metal Bay Windows and Cornices Presents Major Challenges

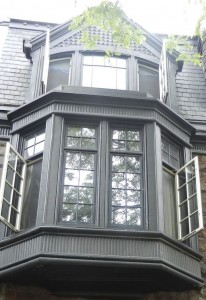
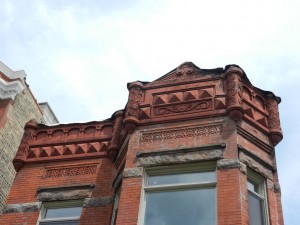
Chicago is endowed with scores of old buildings, whose facades are adorned with historic metal bay windows, large crows and cornices. These buildings were largely built between 1880 and 1920. Every one of these metal elements were unique in design and constitute an important part of Chicago’s architectural heritage. Preserving that heritage and helping to restore its beauty is part of our role as painting contractors and historical restoration specialists in the Chicago area.

Chicago Historic Metal Bay Window

Attached are two examples of such beautiful historic metalwork in Chicago, one is a two-story bay window, the other a large cornice. Why is the maintenance of important architectural features like these such a challenge? Their location and the

Chicago Historic Metal Cornice

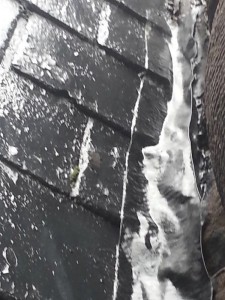
Chicago Historic Metal Bay Window – Failed Caulk and Flashing

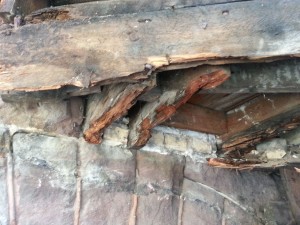
Chicago Historic Metal Bay Window – Rotted Wood Support

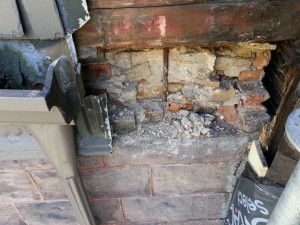
Chicago Historic Metal Bay Window – Decaying Masonry

difficulty of access are two clear obstacles. They are often located on the second, third or fourth level of the building. “Out of sight and out of mind” often becomes the operating rule. Additionally, the building’s façade is often located next to a busy sidewalk or just a few feet away. The logistical aspects of going up to inspect these surfaces and perform the needed repairs most often deters the owners from doing the needed maintenance until serious and evident signs of distress appear.

These metal architectural elements are commonly mounted to masonry (brick or stone) and sometime on slate roofs as well. Masonry and metals have minds of their own when it comes to adjusting to temperature shifts and weather. As a result, caulking and flashing materials are subjected to great stresses. The progressive failure of these weather barriers is the entry point to the decay of the metal structures. The maintenance of these weather barriers is critical to keeping serious problems at bay. This maintenance can generally be performed off ladders at a relatively low cost.

However, when maintenance is neglected, water instruction begins to wreak havoc on the inner wood support and the masonry work behind those metal elements. The last two pictures show the damage that ensues. When water intrusion has gone on for a long time, the damage is so extensive that the metal elements have to be entirely rebuilt. Rebuilding the architectural features can easily cost between $20,000 and $60,000, depending on their complexity and size. We are on such a project right now. Stay tuned for pictures of the restoration of one of Chicago’s historic building façades.

Venting a Dryer or Bathroom Fans in an Attic Creates Mold

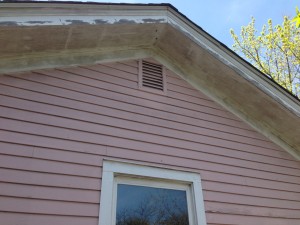
Mildew Problem on Eaves – 1

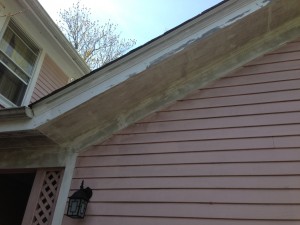
Mildew Problem on Eaves – 2

When doing exterior house painting, especially in Northern areas like Chicago, you can expect to have to deal with mildew. In order to flourish, mildew needs moisture, darkness and food. Not surprisingly, the North side of a house is especially vulnerable to mold. However, when we see mildew thriving on the sunny side of a house, we ask more questions to find out what may be going on with the house.

We recently saw such a situation, as shown in the attached pictures. The eaves, all around the garage were loaded with mildew. After taking a quick visual of the problem, I asked the owners: “Is there something venting in your attic?” A quick answer followed: “Yes – our dryer, but we have louvered openings in the gables.” I said that the moisture thrown off by the dryer was such that it overwhelmed the attic’s ability to vent off the moisture. They never thought the mildew issue was related to the dryer’s moisture. They said they would have the venting issue corrected immediately. I also advised them to have the attic inspected. If the mildew issue is this bad outside the attic, I could only imagine what the inside looks like.

A few years ago, we ran into a similar situation, where the bathrooms on the second level all vented in the attic. The attic was actually covered in mildew – it was black! The client had to have a mold remediation crew come over to eradicate the problem. With the benefit of hindsight, I remembered my eyes getting itchy and teary after fifteen minutes in the house on my initial visit.

As house painters, we see our role as going beyond paint. We look to understand what is at the source of the problems, so we can empower our clients to be good stewards of their property.

Repairing Cracks on High Ceilings

Repairs to surfaces, prior to painting, are a critical part of the work we do as house painting contractors in the Chicago area. Especially challenging repairs are the cracks that sometime develop in the crease of high cathedral ceilings.

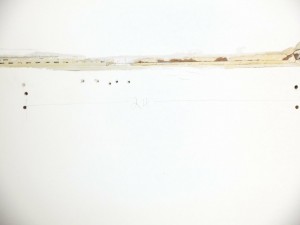
Crack Repair on High Ceiling #1

Crack Repair on High Ceilings #2

Crack Repair on High Ceilings #3

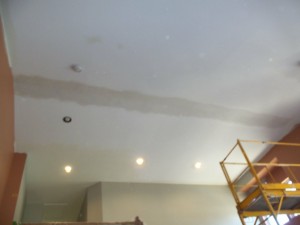
On a recent project, we had such a crack to repair between the horizontal plane and the slanted portion of a twenty-foot-high ceiling. How did we go about repairing this crack? Here are the steps we took:

1- A rolling scaffolding is essential to do the work properly and safely.

2- The first step consists of removing any old compound and tape which has become loose or delaminated. Using a utility knife or razor blade is used to cut away the failed material (see picture #1).

3- Stabilizing the drywall near the crease area is also critical. The drywall is supposed to be screwed to wood, but sometime there is not an adequate amount of screws, which allows the drywall to move and crack at the seams. Stabilizing the drywall by adding screws is essential to producing a lasting repair (see picture #1). On our project, the studs were twenty-four inches apart, which added to the stress on the drywall fasteners.

4- Then, we use Durabond to fill the cavities and lay a soft bed in the seam area before laying down a vinyl tape, perforated on the edges for added strength. The vinyl tape is then partially covered with a thin layer of Durabond. Vinyl tape is used instead of paper tape, because it will not tear like paper would when subjected to stress (see picture 2).

5- Once the compound has dried, one or two thin coats of easily sandable compound is used to complete the repair (see picture #3).

6- After the compound is sanded, the repair is complete.

As painting contractors, when repairing cracks, we are always concerned about using materials and techniques that ensure the longevity of the repair. In a few instances, we even had a carpenter come in to add wood support for the drywall in the attic in order to properly stabilize the drywall.

Stenciling Garage Doors? Why not!

Exterior painting does not have to be limited to just the colors you select for the painting project – it can involve decorative painting as well. When you pull up to your house at the end of the day, the first thing you see is your garage door. It can be a welcoming feature of your house, something that will bring a smile to your face every day.

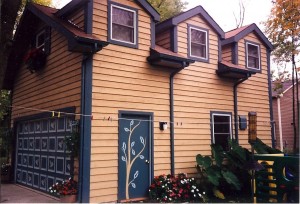
Decorative Painting on Garage Doors

As an illustration of this concept, I would like to tell you about the painting of the garage doors for the shop/office building for Painting in Partnership. Shortly after building this structure on the rear of the property where my house is located, my wife suggested we dress up the doors to give them more pizazz. I liked the idea. So she proceeded with developing a 3-color stylized leaf pattern, which we would then stencil unto the panels of the garage door. To complement the garage door motifs, she designed a stylized tree with the same leaf pattern for the entrance door.

Wow! I thought those were cool designs. So I proceeded to execute the painting. The main materials besides the paints were the plastic sheeting for the stencils and the stretchable tape for the curvy lines of the tree, plus a good measure of patience and attention to detail. The major challenge was to maintain crisp stencil lines, in spite of the strong wood grain texture of the garage door.

Paneled garage doors present wonderful opportunities to use decorative painting to make a statement by introducing a splash of color, on otherwise plain surfaces. As house painting contractors in the Chicago area, we thrive on using color and custom patterns to enhance the beauty of clients’ home environments.

Looking for Early Signs of Paint Failure Saves Money!

House painting is commonly looked upon as a once-in-many-years event, which often translates as follows: wait until everything looks bad and then do it over. There is a better and cheaper way!

Paint Maintenance Eye

The problem with this conventional approach is that, by the time your house looks like it really needs a paint job, other serious problems may have developed that will require expensive carpentry repairs, the replacement of windows or doors and, sometime, the repair of interior damage caused by an exterior issue. These problems could have been avoided or greatly minimized if they had been detected early.

As house painting contractors, we believe in paint maintenance and the concept that an ounce of prevention is worth many pounds of correction. We recommend a periodic inspection of the exterior painted surfaces of a house. For newer homes, we recommend inspecting the house every three years at the most. For older houses, we recommend two years. For the oldest wood houses in our care, we recommend a yearly inspection. What do we look for?

When doing a paint inspection, we pay close attention to the condition of the caulk. When caulk begins to crack, it is a point of entry for moisture, which often gets trapped and will rot the wood. Where is this most likely to occur? The most vulnerable areas are: miter cuts, where a brick molding meets the sill, where two wood surfaces meet and where wood meets a different substrate like brick or masonry.

Our paint inspection also focuses on detecting early signs of paint failure. Where are they more likely to occur? They are: window sills, the top portions of muntin bars, the top of the rails on panel doors, the lower four feet around a house, the dormer surfaces near the roof shingles and the trim boards around gutters. Old clapboard house with ten to twenty coats of paint present an added challenge. The surface tension on the paint coating is such that, combined with our harsh Northern climate, it can cause all the paint layers to crack and begin to fail.

Having detected the paint maintenance issues, we then repair the caulk, prep the painted areas, spot-prime and spot-paint as needed. Doing this kind of paint maintenance can be done in one or two man-days for newer houses and two to four man-days for old houses. It not only adds years to the useful life of a paint job, improves the long-term appearance of the house, but also saves money on costly repairs and replacement. Call on us today for your FREE paint inspection.