Each room was unique to itself and yet all were connected in harmony. Our home became a warm, inviting and comfortable place.
- Charlotte and Michael Paull, Kildeer
Phone: (847)934-8885 | Email: info@paintpartner.com Visit PIP's Facebook Page View Mario Guertin's LinkedIn Profile Visit PaintPartner's Google+ Page Follow PaintPartner on Twitter Visit PIP's Pinterest Page Visit PIP's Houzz Page Subscribe to PaintPartner's RSS Feed

Repairing Plaster in a One-Hundred-Year-Old Farmhouse

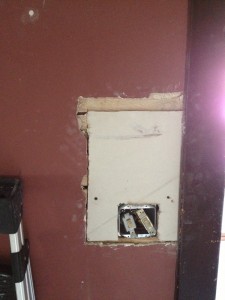
Repairing Holes in Old Plaster – A


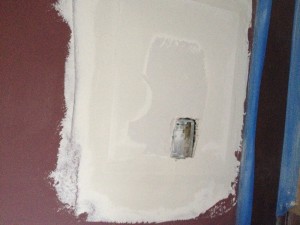
Repairing Holes in Old Plaster – B


One of our clients owns a farmhouse that was originally owned by one of the Busse family members, the original settler family of Mount Prospect in the Northwest suburbs of Chicago, who came to the area from Germany on the mid-nineteenth century. Today, the family tree has grown to over 2,200 people!
Being a farmhouse, its bones were more humble. For instance, the plaster was a mere one quarter to three eights of an inch thick. Over time, the plaster became quite fragile, especially on the ceilings, where the plaster keys simply gave way. The owner had that problem remedied e few years ago by covering the ceilings with quarter-inch drywall.

Over the years, the owner did a number of things to modernize, preserve and restore the house, especially on the outside. This year, she turned her attention to the interior of the house. High on her list was to bring the electrical

wiring up to code. The electrician doing that work turned out to be reciprocating-saw-happy! In three rooms, he made a total of twenty four good-size holes in the walls and ceilings, cutting through the lath and plaster from stud to stud.

Our painting and decorating company was first tasked with repairing all the holes created by the electrician and then, in a second phase, develop a “period” color scheme for those rooms. The fragility of the old plaster and the nature of the holes made our repair work especially challenging. In order to respect the client’s cost constraints, we decided to use drywall pieces of varying thicknesses to cover the holes. We first had to install wood braces to the old lath and studs, so we could secure the drywall pieces. We then applied two tight coats of setting joint compound, followed by two or three coats of lightweight joint compound. The end result was smooth as baby’s skin!

Working on older or historic properties and helping their owners in preserve their piece of history is what we love to do.

Restoring One-Hundred-Twenty-Year-Old Corbels on a Chicago Building’s Facade

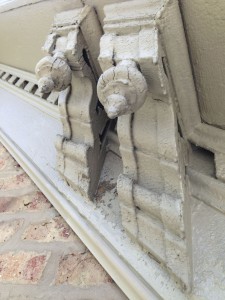
Antique Corbels – Before

In the 1880’s, it was common to adorn the façade of Chicago masonry buildings with a large wood cornice and corbels>/strong>. Our painting and decorating company recently did the restoration of such architectural elements in the Bucktown area of Chicago.

Over a long period of time and numerous coats of paint, the paint surface begins to develop small cracks in a pattern similar to the skin of an alligator. This paint phenomenon is known as “alligatoring”. If lead paint is present, which is highly likely for a building of that vintage, the alligatoring would take on more rectangular shapes. Once these cracks begin to develop, it makes the coating more vulnerable to water intrusion. After a few more years, the alligatoting begins to crack open and peal off. This is when paint accelerates and the wood becomes vulnerable to decay, since it is left open to the elements. The coating in our Bucktown cornice restoration project was in remarkably good shape, although it was badly alligatored. What steps did we take to restore this antique cornice and corbels?

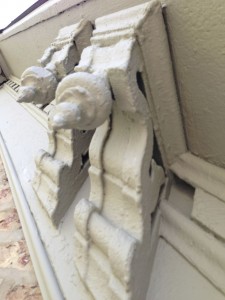
Antique Corbels – After

First, we cleaned the surfaces by hand. Then, we scraped whatever paint would come off with carbide blades. We then primed the surfaces with an adhesive, high-built primer. We used this particular primer for two major reasons. First, the product is very thick and fills in all the alligatoring patterns and partially evens out surfaces where the paint came off. As a result, the appearance of the cornice improves substantially. More importantly, this primer has elasticity and adhesive qualities. It therefore impedes the progress of the alligatoring process. For those reasons, it is a go-to-primer in our historic restoration of wood surfaces. Finally, we used a high-built satin paint as a topcoat.

Improving the appearance and longevity of historic architectural structures and features is what our restoration work is all about.

The Challenges of Preserving the Colonel Palmer House’s Crown Moldings

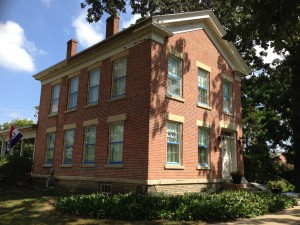
This week, as paint restoration specialists from the Chicago area, we undertook work on a historical, 1858, Greek Revival and Federalist brick house built for Gustavus Palmer, a successful farmer and early settler in McHenry county. The house sits on its original corner lot in Crystal Lake, Illinois and still looks quite impressive. In 1985, the house was added to the National Register of Historical Places and the Park District is now responsible for the preservation of this special piece of McHenry county history.

Paint Failure on Colonel Palmer House – 1

Because of its design, the house has no gutters. The water drains over the large crown and dental moldings, and causes the paint to fail in a major way, thereby compromising the integrity of the original wood components of the building. As shown in the first picture, on the West side of the house, once the scraping process started, one hundred fifty five years of paint came off a twenty foot section of the crown. To preserve the wood, we used a product designed to restore wooden boats. The product is a Clear Penetrating Epoxy Sealer (CPES) known as “ The Rot Doctor ”. It seals the wood fibers and creates an ideal surface for paint to adhere to.

Paint Failure on Colonel Palmer House – 2

As shown in the second picture, the problem was more severe on the East side of the house. The water had rusted through the original nails holding the dentals to the base molding. The base molding had warped and pulled away from the upper crown. In addition to the CPES product, we used epoxy to fill the gaps and cracks in the wood. As a final step before caulking and painting, we applied a coat of high-built adhesive primer to all the trim elements of the building, including the window casings, which were original to the house. The crown moldings and window casings were seemingly made of old-growth wood, which survived in these hash conditions, without rotting for over one hundred fifty years. This wood is still hard as stone today! Wood like this deserves every bit of care we can muster to help preserve it for another century or more.

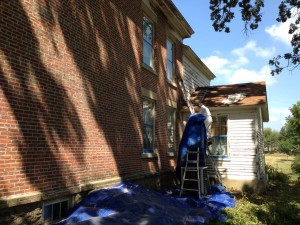
As you can also see in the second picture, since our painting and decorating company is EPA Lead-Safe Certified, the paint scraping process was done in compliance with EPA regulations. It involved setting up containment for the paint debris, sealing the windows, wearing protective garments, respirators etc., all this in 90 degree heat this week!

As a pioneer and early settler’s house, the Colonel Palmer house is quite remarkable by its size, style and quality of materials used in its construction. This was no shack on the prairie! It is well worth preserving for the generations to come.

Secrets to Prepping New Galvanized Steel Before Painting

Prepping Galvanized Steel for Painting

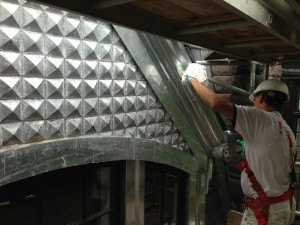
We are currently working on the historical restoration of the façade of one of the three adjacent brown stone houses Potter Palmer had built for his three daughters in the late nineteenth century on Chicago’s Gold Coast area. The project involved the complete rebuilding of the metal 2-story bay window, cornice and slate roof elements. All the metal surfaces were faithfully recreated using galvanized steel, which we needed to paint in a high-gloss black.

The manufacturing process for galvanized steel leaves the surface of the steel coated with a thin oily film. It is essential to remove that oily substance before any primer or coating can be applied. To do the job properly, we used lacquer thinner, scrub pads and rags to clean the metal surfaces. Using a scrub pad really helps to loosen the oily film and rags finish up the job.

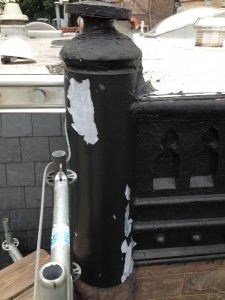
Failed Coating on Galvanized Steel

Not properly cleaning the new galvanized steel in this way will result in the premature failure of any coating put on the steel. A good example of this is the corner turret on the next-door neighbor’s house, as shown in the picture. As you can see, the coating has simply not adhered to the steel and is massively failing. Our client instructed us to strip and refinish her neighbor’s turret on her own dime, as a courtesy for her neighbor putting up with the scaffolding for three months, while her façade restoration was taking place.

Another important step in properly finishing galvanized steel is to use a bonding primer specially designed to adhere well to that metal. No oil-based primers should be used – only waterborne bonding primers. The paint we selected for the project was an industrial High Performance Acrylic designed for challenging environments like this.

As house painting contractors in the Chicago area for almost twenty-five years, we have long learned that surface preparation is key to a successful paint job.

The Cost of Refinishing a Wood Front Door or Garage Door

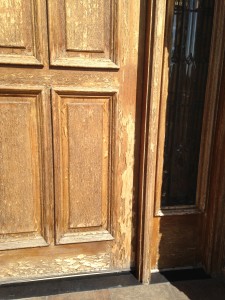
Failed Coating on Wood Front Door

Stripping the finish off and refinishing a wood door is a time consuming and expensive process. At least fifty times a year, we are asked to refinish wood doors that it be a front entrance or a garage door. In the great majority of cases, marine or spar varnish had previously been used as a clear coat over the stained surfaces. The problem with that clear coat is that it is very brittle. After a couple of years it begins to crack and let moisture infiltrate below the coating. After that happens, the coating deteriorates rapidly. Below is a picture of how a door can look like after a few more years.

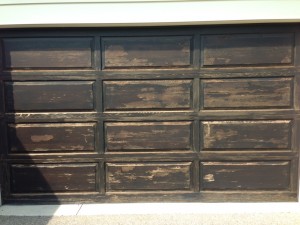
Failed Coating on Wood Garage Door

Sometime, realizing the finish on the door is in trouble, an owner will try to hide the problem by adding more stain or having the door coated with a semi-transparent stain. As shown in the other picture, the result can be less than satisfactory. Over my twenty four years as a painting and decorating contractor, I find that homeowners do know how to detect the early signs of trouble and take quick action to prevent further deterioration. The bottom half of the door is most vulnerable, especially the lower rail molding of each panel. At the first sign of the coating beginning to crack in those areas, it is time to intervene! At that stage, the expense is very limited: a cleaning and a re-varnishing will add another two, may be three years, of longevity to the coating before the next round of maintenance.

Unfortunately, homeowners often wait too long. By the time they realize their door needs work, it is too late to save the coating and the whole door has to be stripped and refinished. The bad news ids that refinishing a wood door is expensive. Depending on the intricacy of the door and the presence of side lites or transom, the refinishing cost may range between $800 and $1,300. For a garage door, depending on its size and the condition of the old coating, the refinishing cost may range between $1,400 and $2,500. The good news, is that, by having us do maintenance on the door every two or three years, depending on the exposure, the door will not have to be refinished for a long time and will always look good. Using the right products and doing the maintenance are critical to wood front doors and wood garage doors looking their best.