I feel that all your employees are true artists and professionals, and their commitment, creativity and craftsmanship are evident in the finished product.
- Diane Hohmann, North Barrington
Phone: (847)934-8885 | Email: info@paintpartner.com Visit PIP's Facebook Page View Mario Guertin's LinkedIn Profile Visit PaintPartner's Google+ Page Follow PaintPartner on Twitter Visit PIP's Pinterest Page Visit PIP's Houzz Page Subscribe to PaintPartner's RSS Feed

Archive for Decorative Painting

What if you Are Tired of Your Mural, but Still Love your Decorative Finish?

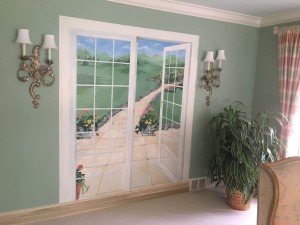
Wall with Trompe L'oeil Mural

Wall with Trompe L’oeil Mural

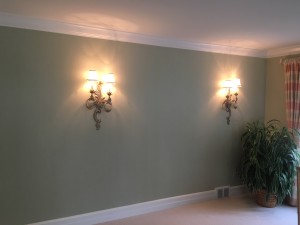
Restored Texture and Decorative Finish in New Color

Restored Texture and Decorative Finish in New Color

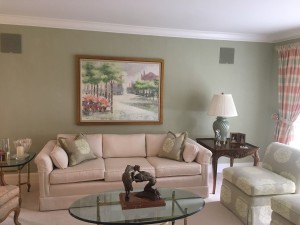
Room Displaing the New Wall Color and Recreated Strie Texture

Room Displaying the New Wall Color and Recreated Strie Texture

A client from the North Shore of Chicago recently had a problem with the decorative finishing in her living room. The problem was two-fold: she was tired of her fifteen-year old trompe l’oeil mural, but still loved the strie texture and softly mottled glazed finish on her walls. She was also looking to change the color of the wall from a blueish green to a yellowish green. The main challenges were to make the mural completely disappear, including its painterly texture, and recreate the strie texture in the surrounding walls.

A strie finish is a traditional finish that is generally created by dragging a brush, a comb or steel wool through a glaze, thereby creating a vertical or horizontal pattern (sometime both). In this case, the strie pattern was created not by dragging a comb through a glaze, but the basecoat instead, which made for a very subtle texture. In order to prevent the finish from closing back on itself, we had to thicken the basecoat with an additive. To complete the finish, we softly mottled a white glaze over the wall surfaces. The overall effect was subtle and beautiful, as shown in the after pictures. The old look of her living room was faithfully recreated, with the modifications the client had requested.

Matching a decorative finish can be daunting task, especially old finishes. The original paints are no longer to be found, even if they were still usable. Additionally, the technology of paint has greatly evolved, which means that today’s products do not perform the same way. In our painting and decorating company, we are committed to using our knowledge and skill to meet the challenges of projects such as these.

Painted Stripes Can Add Wow Appeal to a Ceiling

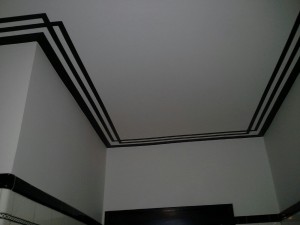
Painted Stripes on Bathroom Ceiling

Painted Stripes on Ceiling – Craftsman Style

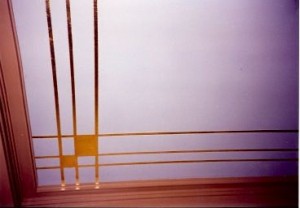
Gilded Stripes on Ceiling – Craftsman Style

As Painting and Decorating Contractors in the Chicago Area, we are called on to execute an array of decorative painting projects. Stripes are one of the options in our bag of tricks. Painted stripes are more commonly thought of to ornate walls, either as a border, or in vertical or horizontal patterns. Unlike wallpaper, painted stripes are custom and can be adjusted to exactly fit the dimensions of a wall. The size and sheen of the stripes can be tailored to meet any need at hand.

An often-overlooked application for painted stripes involves ceilings. We recently worked on such a project in a 1920’s bungalow on Chicago’s North side. The room was the house’s hall bath. The lower six feet of the walls was clad with a white subway tile, a black bullnose and base, as well as a thin patterned black/white stripe. We painted the upper wall and ceiling in a color to match the white tile. Then came the fun part: executing a stripe pattern that worked well with five inside corners and one outside corner.

Coming up with the appropriate design was a major challenge. The lady of the house had a picture of a ceiling pattern. However, it turned out it could not accommodate the outside corner, without making the pattern look disjointed. This is when her husband was inspired to try his hands at coming up with a design. His first attempt crashed and burned. His second was a resounding success: he nailed the design, as shown in the attached picture!

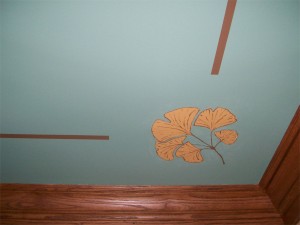
Painted stripe designs can also be very effective in “Period” houses, like Art Nouveau, Craftsman or Art Deco styles. I have attached pictures of two Craftsman-style projects to illustrate the possibilities. For the first one, we created a Gingko-leaf pattern to frame the four corners of a living room. In that case only a single painted stripe was used, which led the eye to the corner designs. The second project involved a dining room. In that case, we gilded a more intricate stripe pattern. That project also involved gilding square wood buttons in the upper corners of five-foot panels framing the room. Look at the metallic sheen!

Offering decorative painting custom solutions to help enhance the beauty of our clients’ vintage houses is part of what we do as house painting contractors.

Creating Painted Arts and Crafts Designs that Fit a House’s “Old Bones”

As decorative painting specialists serving the Chicago area, we are occasionally called on to create original painted decorative motifs that are flattering to the “period” or architectural style of a building. In this article, we are presenting two designs that we created for Arts and Crafts and Craftsman style houses.

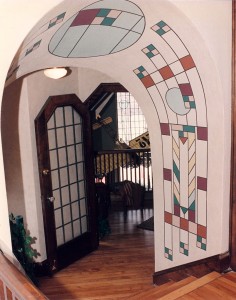
Arts and Crafts Painted Design

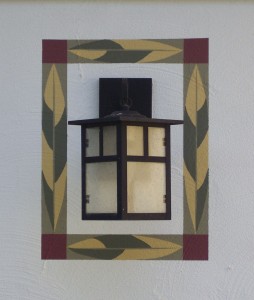
Craftsman Style Painted Design

The first one is our equinox archway, designed to mirror the equinox pattern in the stained glass window in the background. The slanted and curved archway seemed like the perfect place to emphasize the delicate design of the large leaded window in the adjacent room. Coming up with the original design for the archway turned out to be the easy part. The execution of the painting was actually more challenging. First, there was the challenge to adjust the design to the geometry of the curved, slanted archway. Then, there was the added challenge of the textured plaster substrate. To meet those challenges, we used stretchable tapes of different widths. Needless to say, in order to produce a flawless result, we needed to touch up many areas where the paint had seeped around the texture and under the tape. In all, this painting project took about a week.

Another of our original designs was conceived to adorn the two coach lights on each side of the garage door for a large two-story Craftsman-style house. The garage being detached from the house, the owners did not want it to compete with the more elaborate color scheme of the house. However, they wanted the find a way to bring the full color palette of the house to the garage structure in a subtle kind of way. This design hit the spot for our client! The substrate for our painting presented similar execution challenges as the project described previously.

Finding ways to embellish and flatter the architectural features of Chicago’s vintage buildings, through the use of our decorative painting skills is part of what we love to do at Painting in Partnership.

Using Decorative Finishing to Replicate the Look of Artwork on Adjacent Walls

We have been using our skills in decorative painting to meet our clients’ requests all over Chicago and the suburban areas for nearly twenty-five years. Using our knowledge of paints, glazes, techniques and tools, we are able to meet the most demanding and unusual requests from our clients.

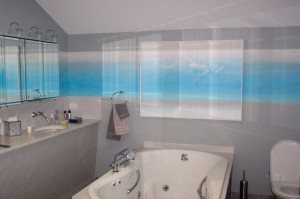
Decorative Finish to Mirror Artwork in a Room

For instance, a client showed me a painting in his master bath. It was about six feet long and five feet high. The painting revealed the naked body of a woman frolicking in the water. The painting had a gray band at the top and bottom and a large band of vibrant aqua, mottled with gray and cream tones to give the feel of water. The client’s request was: “Can you replicate the colors and feel of the painting around the room, as if the painting bursts out of its frame? After taking a closer look at the painting, my answer was: yes, Painting in Partnership can do this for you!

The first step in a project like this always consists of preparing a sample board to ensure good color and style matches. After the client approved the sample, we painted the walls the same shade of gray as in the painting. We then rehung the painting and established the exact height of the color bands and used a laser to spread them around the room. We then used a combination of four glazes: teal, cream, white and gray to replicate the look of the painting. We used brushes, cheesecloth and a badger brush as our main tools.

Over the years, our client’s requests have inspired the development of some of our most creative work and finishes. Decorative painting gives us a wonderful array of options to meet our clients’ most sophisticated requests.

Restoring a Forty–Year Old, Gold-Glittered Popcorn Ceiling

Popcorn ceilings are a type of decorative finish that became very popular in the 1950’s and remained in fashion through the 70’s. It consisted of a sprayed application of paint, combined with a lumpy aggregate. Glitter was sometime injected into the wet paint for an additional decorative effect. Silver was most popular, followed by gold and clear glitter. A common popcorn aggregate was asbestos, which eventually caused the demise of popcorn ceilings when it was banned for use in construction materials in 1977. Even though other aggregates like polystyrene and Styrofoam existed, other issues like poor clean ability and the need for artful repair caused this decorative finish to fall out of fashion; however, not for everyone!

Ceiling Glitter Gun for Popcorn Ceilings

As house painting contractors and decorative painting specialists, we are sometime called on to restore older decorative finishes. A new client from the far Northwest suburbs of Chicago recently made such a request. He has a gold-glittered popcorn ceiling on a high ceiling in his living room. The finish is over forty years old and he has enjoyed it for all the twenty years he has lived there. An unsightly water stain appeared on the ceiling before he had the roof replaced, which prompted him to seek to have his ceiling restored; gold glitter included!

After speaking to my colleagues Joel Hamberg from Oregon and Mark Coley of Connecticut, as well doing a couple of hours of research on Google, I was able to gather all the information I needed to tackle this ceiling restoration, which will take place in February. The most challenging part of the research was to find a manufacturer that still made glitter guns. The first one I found was a hand-operated version. However, it turned out that although still displayed on the web, the manufacturer had stopped making it. Determined to find one, I finally stumbled across a pneumatic version on page twenty-one of my Google search; and it is a beauty! It is operated in conjunction with a compressor and comes equipped with two different ceramic tips. It arrived yesterday with the gold glitter I need. Wow, I am ready to go!