The painters were top notch. They worked very efficiently, courteously and extremely cleanly.
- Jack Bernauer, Inverness
Phone: (847)934-8885 | Email: info@paintpartner.com Visit PIP's Facebook Page View Mario Guertin's LinkedIn Profile Visit PaintPartner's Google+ Page Follow PaintPartner on Twitter Visit PIP's Pinterest Page Visit PIP's Houzz Page Subscribe to PaintPartner's RSS Feed

Archive for House Painting – Page 2

Repairing Cracks on High Ceilings

Repairs to surfaces, prior to painting, are a critical part of the work we do as house painting contractors in the Chicago area. Especially challenging repairs are the cracks that sometime develop in the crease of high cathedral ceilings.

Crack Repair on High Ceiling #1

Crack Repair on High Ceilings #2

Crack Repair on High Ceilings #3

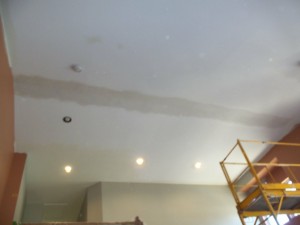
On a recent project, we had such a crack to repair between the horizontal plane and the slanted portion of a twenty-foot-high ceiling. How did we go about repairing this crack? Here are the steps we took:

1- A rolling scaffolding is essential to do the work properly and safely.

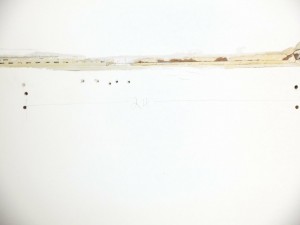
2- The first step consists of removing any old compound and tape which has become loose or delaminated. Using a utility knife or razor blade is used to cut away the failed material (see picture #1).

3- Stabilizing the drywall near the crease area is also critical. The drywall is supposed to be screwed to wood, but sometime there is not an adequate amount of screws, which allows the drywall to move and crack at the seams. Stabilizing the drywall by adding screws is essential to producing a lasting repair (see picture #1). On our project, the studs were twenty-four inches apart, which added to the stress on the drywall fasteners.

4- Then, we use Durabond to fill the cavities and lay a soft bed in the seam area before laying down a vinyl tape, perforated on the edges for added strength. The vinyl tape is then partially covered with a thin layer of Durabond. Vinyl tape is used instead of paper tape, because it will not tear like paper would when subjected to stress (see picture 2).

5- Once the compound has dried, one or two thin coats of easily sandable compound is used to complete the repair (see picture #3).

6- After the compound is sanded, the repair is complete.

As painting contractors, when repairing cracks, we are always concerned about using materials and techniques that ensure the longevity of the repair. In a few instances, we even had a carpenter come in to add wood support for the drywall in the attic in order to properly stabilize the drywall.

Looking for Early Signs of Paint Failure Saves Money!

House painting is commonly looked upon as a once-in-many-years event, which often translates as follows: wait until everything looks bad and then do it over. There is a better and cheaper way!

Paint Maintenance Eye

The problem with this conventional approach is that, by the time your house looks like it really needs a paint job, other serious problems may have developed that will require expensive carpentry repairs, the replacement of windows or doors and, sometime, the repair of interior damage caused by an exterior issue. These problems could have been avoided or greatly minimized if they had been detected early.

As house painting contractors, we believe in paint maintenance and the concept that an ounce of prevention is worth many pounds of correction. We recommend a periodic inspection of the exterior painted surfaces of a house. For newer homes, we recommend inspecting the house every three years at the most. For older houses, we recommend two years. For the oldest wood houses in our care, we recommend a yearly inspection. What do we look for?

When doing a paint inspection, we pay close attention to the condition of the caulk. When caulk begins to crack, it is a point of entry for moisture, which often gets trapped and will rot the wood. Where is this most likely to occur? The most vulnerable areas are: miter cuts, where a brick molding meets the sill, where two wood surfaces meet and where wood meets a different substrate like brick or masonry.

Our paint inspection also focuses on detecting early signs of paint failure. Where are they more likely to occur? They are: window sills, the top portions of muntin bars, the top of the rails on panel doors, the lower four feet around a house, the dormer surfaces near the roof shingles and the trim boards around gutters. Old clapboard house with ten to twenty coats of paint present an added challenge. The surface tension on the paint coating is such that, combined with our harsh Northern climate, it can cause all the paint layers to crack and begin to fail.

Having detected the paint maintenance issues, we then repair the caulk, prep the painted areas, spot-prime and spot-paint as needed. Doing this kind of paint maintenance can be done in one or two man-days for newer houses and two to four man-days for old houses. It not only adds years to the useful life of a paint job, improves the long-term appearance of the house, but also saves money on costly repairs and replacement. Call on us today for your FREE paint inspection.

House Paints Were Used by Picasso and his Contemporaries

House painting was not the intended use. However, you may be surprised to know that Picasso and his contemporaries, in the earlier part of the twentieth century, used house paints in the creation of their paintings. How did I come upon this interesting piece of trivia?

We, at Painting in Partnership, are painting contractors in the Chicago area. Over the years, we have assembled an extensive collection of paint industry memorabilia, which includes a large collection of paint catalogs from old-time Chicago paint manufacturers of the first half of the twentieth century. All the color cards in the collection contain original paint samples.

Old Ripolin Paint Label

Old Ripolin Paint Label

Earlier in the Summer, I wrote a blog post about my paint catalog collection. Shortly after, I received an email from a researcher who works for the Scottish government. A good part of his research and personal interests are focused on lead-based paints and the development of look-alike alternatives. I quickly arranged for a face-to-face meeting on Skype to discuss his interests and how my collection could be used as a reference point.

In the course of that conversation, he told me of a research project being conducted in France by the Art Institute of Chicago. The four-year-old project aims to document the formulation of the house paints (early oleo-resinous paints) that were used by artists, like Picasso, in that time period. Because the research is being conducted in France for the moment, particular attention is given to the use of the French Ripolin paints. The results of the research will be presented next year at a symposium in southern France entitled “ From Can to Canvas ”. The Art Institute’s partners for this symposium are the Picasso Museum in Antibes and a conservation organization in Marseille.

The scientist form the Art Institute already made contact with me. Perhaps, with the help of my collection of reference materials, a United States chapter can written on the use of house paints by American artists.

This story illustrates the power of the web in connecting people from all over the world who share common concerns and interests; in this case a painting contractor from Chicago who is interested in preserving paint industry memorabilia and historical paint preservation experts who live four thousand miles apart.

Residential Painting that Delights!

A house painting project, and re-decorating in general, have the potential for enhancing the quality of life and the mood of the occupants of a house. Well executed house painting, coupled with personalized colors, can also inspire and make people feel nurtured in their environment. These beliefs motivate us, as painting contractors, to go to work every day and strive, with our employees, to produce such results for our clients.

In January, Painting in Partnership received an email from a client, which was really heart-warming in its enthusiasm and excitement about their new décor and their painting and decorating experience. Here it is:

“I anticipated that by now we’d have moved all the furniture and paintings back to their original places against the walls. But that’s just not going to happen. The walls are far too beautiful. Anything that hopes for a place in front of our walls will have to prove its worth first.” By Richard Medina

Those words go to the heart of the emotions and warm feelings we work to produce in our clients on every house painting project.

Craftsman Painting Tips – Planning your Interior Painting Project

Before launching on an interior house painting project, it is a good idea to plan out your project. Answering the five questions below will help you have a successful and enjoyable painting project.

First, what needs to be done to the room?
Do you want to only paint the walls? What about the ceiling, the trim, doors, windows? What about the dreaded closet? Answering these questions will help you decide what paints you need for your house painting project. For the ceiling, you might need a flat paint, for the walls, a matte enamel or eggshell, for the woodwork a satin finish. Once you settle on colors, you are ready to order paints.

Second, what is the condition of the surfaces?
An interior painting job (and exterior painting one just as well) is only as good as the preparation work. Are there cracks? If so, you will need fiberglass tape and patching material. Are taping joints failing? You will need drywall paper tape. Are there nail pops? You might need pliers (or hammer) and screws. You may also need two or three grades of sandpaper (100, 120 and 220 grit). Yes, do not forget caulk, painters’ best friend. Make a list of all the non-paint materials you might need for your project and what you need to order, in addition to the paints.

Third, what supplies will I need?
Protecting surfaces during the painting process is an important part of any house painting. You might need two or three types/sizes of tape. Two- inch painters tape should be used to tape the carpet along the baseboard. A two-inch “low tack” tape could be used on the top of the baseboard after painting it to avoid spatters when you paint the walls. The level of tack in the tape is important because too strong an adhesive will ruin a paint finish. You will also need tarps to cover the floor and plastic sheeting to cover the furniture. Depending on the paints you plan on using, you may need different brushes and rollers, perhaps some thinner as well. Oh yes, do not forget the rolling pan, bucket(s) and a roller handle.

Fourth, what equipment will I need?
Depending on the height of the room, or its location, like in a stairway, you will need a ladder of the appropriate height. In a stairway, you will need an expandable plank. Investing in safe and appropriate equipment is critical to your health and the success of your house painting project. An articulated ladder is the most versatile of ladder for use in houses. For speed, consider using an expandable pole (2’ to 4’ or 4’ to 8’).
You are now ready for a trip to the paint store!

Fifth, how do I sequence my steps?
Having a clear plan of attack is critical to the success of a house painting project. Here is the recommended sequence:
1-Protect all surfaces not to be painted. Use tarps, tape and plastic sheeting as needed.
2- Complete ALL surface preparation on all surfaces before touching a brush.
3- Caulk all surfaces as needed.
4- Paint ceiling.
5- Paint all trim elements. The doors and windows can be done last.
6- Paint walls.
7- Clean up the work area after completing the house painting project

Voila!